Maintenance on your Linux Box
After you have installed your new Linux OS, you need to do some maintenance on your Linux box. This is just a few things you should do!
- Updates
- Programs needed for maintenance
- Clean your Home Directory
- Configure Bleach Bit
- Install Chrome Web Browser
- Configure Printers
- Configure Synaptic
- Backup List of Programs Installed
- fstab backup
- Backup your Home Directory
- Disable Hibernation
- Change Display Drivers
1. Update:
Open up your Update Manager. Mint distro’s usually load it automatically and is in the tool bar and looks like a shield. It may have a check mark in the center which means your system is up to date. If it has blue in the middle, then there are updates to be installed.
Why do updates: Security and Bug fixes.
2. Programs needed for maintenance
- bleachbit
- gksu
- catfish
- grsync
- cups-pdf
- gpart
- gparted
- system-config-printer
- unetbootin
Open your Software Manager program and install the programs listed above. (Note: when you see the program your trying to install, double click on it to open the description of and click on the install button.) If it shows it already install then skip and go on to the next one.
3. Clean Up Temporary Files
On Linux systems, the /tmp directory for temporary files. If you came from Windows, nobody told you to do this, so start now. The area, /tmp, gets cleaned up automatically.
The cleanup for most other temporary files are handled automatically, but some editors may leave files ending with a ‘~‘ character laying around. Cleaning these files is a pretty simple find command. You can clean them up under your HOME as a normal user.
Step 1: Find your temporary files
Open the program Catfish and in the search bar type ~ into the bar. That’s the symbol on the keyboard to the left of the number 1. Need to use the shift key.
Once the Catfish program has finished scanning you should see a list of files that have the ~ symbol at the end. Highlight them all and then delete them all.
Be patient as it might take a while. You could have thousands to delete. That’s it for cleaning up temporary files.
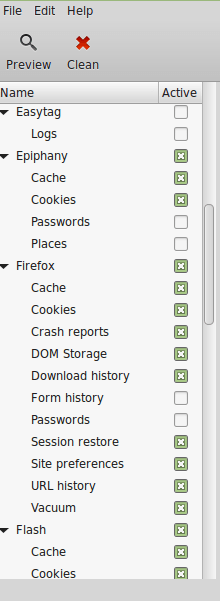
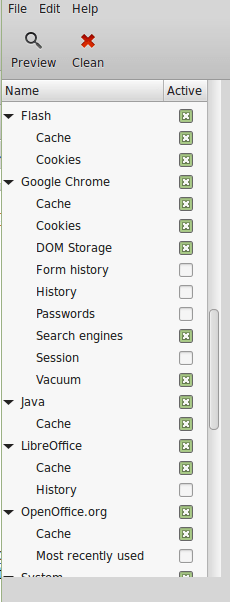
4. BleachBit – Configure it:
- Click on Menu button, go to System or Administrator and select the BleachBit program
- See Example 1 -4 to see how to configure and check the boxes that need to be checked.
- After you have checked all the boxes in the example, Hit Clean then Delete and see how much space it saves you.
Example: 1 -4


5. Install Chrome Web Browser
If you don’t want to use Chrome then skip this.
- Open your current web browser and go to https://www.google.com/chrome/browser/
- Click on Download and then select the 32 or 64 For Debian/Ubuntu bit version you need and save it.
- Then open a Terminal window and type in the following sudo dpkg -i home/bob/Downloads/*.deb
Now you should have the Chrome Web Browser installed and should be in the menu list under Internet
6. Configure Printers
Before you start here, make sure your Printer is on.
Click on your Menu button and go to System or Administrator and click on Printers.
Make sure your Printer shows up in the list of printers. If not click on Add and install your printer.
Most Linux distro have Save as PDF when you go to print. However if you don’t want to have to type in a file name each time then continue on.
Open a Terminal window and type in gksu gedit /etc/cups/cups-pdf.conf if using XFCE. For Cinnamon users Type in gksu nemo /etc/cups/cups-pdf.conf
Scroll down to you see:
#Cut 3
### Key: Label
## label all jobs with a unique job-id in order to avoid overwriting old
## files in case new ones with identical names are created; always true for
## untitled documents
## 0: label untitled documents only
## 1: label all documents with a preceeding “job_#-”
## 2: label all documents with a tailing “-job_#”
### Default: 0
# Label 0
Change to say:
#Cut 3
### Key: Label
## label all jobs with a unique job-id in order to avoid overwriting old
## files in case new ones with identical names are created; always true for
## untitled documents
## 0: label untitled documents only
## 1: label all documents with a preceeding “job_#-”
## 2: label all documents with a tailing “-job_#”
### Default: 0
Label 1
This will change the way it saves the job without over writing each job which is default.
Now when you select PDF printer it save all jobs in the /home/bob/PDF directory.
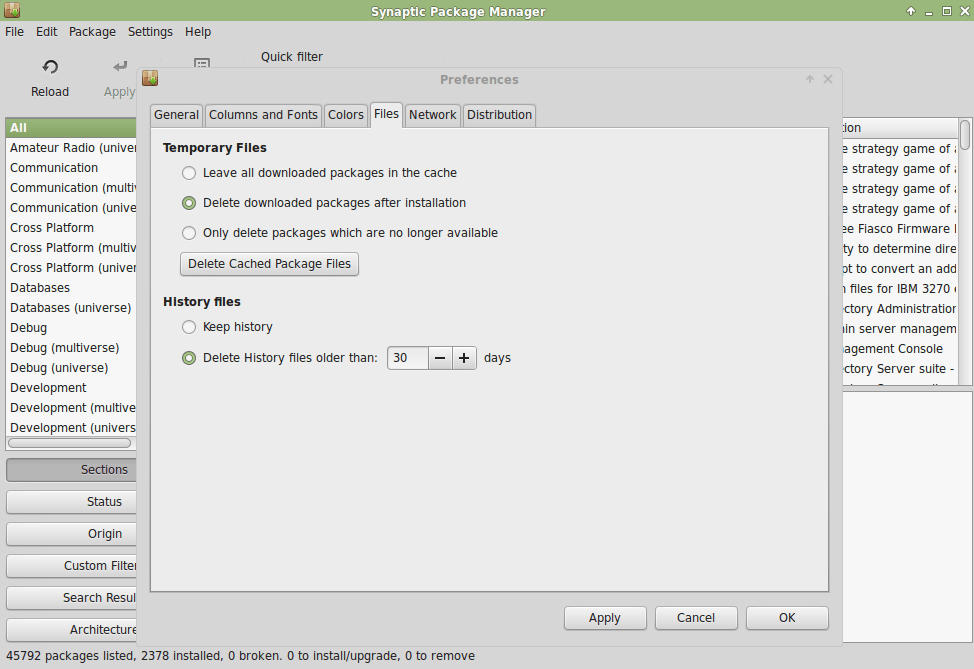
7. Configure Synaptic
By default Synaptic save all the packages it downloads and this can waste a lot of space. So it’s best to configure Synaptic to delete packages after they are installed. This is how to configure to delete packages after they have been installed.
- Open Synaptic
- Click on Settings on the menu bar
- Click on Preferences
- On the top tabs click on Files
- Under Temporary Files click on Delete download packages after installation
- Next click on Delete Cached Package Files – This will delete all the update packages you already installed when you did the updates.
- Last, Under the History files, click on Delete History files older then:
- Your done, close Synaptic
Example:
8. Backup List of Programs Installed
It’s always a good idea to have a list of all the programs you have installed on your system. Why:
- In case you crash your system and need to re-install it you will have a list of all the programs to re-install.
- When re-installing your system or installing a new one, Don’t format your Home Directory and all your programs preferences will be intact after your re-install the programs from you backup list.
Backup your Programs List:
- Click on the Menu button and go to System or Administrator, click on Backup Tool. Enter your password
- Click on Backup Software Collection
- Click on the drop down box and pick Other and select your Home Directory
- Click on Forward
- Click on Apply
- Last click on Close
Your Done with your backup of the program list.
9. Backup Your fstab file.
Fstab is the operating system’s file system table. The fstab file is located at: /etc/fstab
- Open your File Manager and navigate to the /etc directory. Find the fstab file and right mouse click on it and select copy. Then Paste into your Home Directory.
It’s good to keep a copy of this file just in case your system crash’s. It contains the information of the extra partitions you created as Data Drives. (See https://everything-linux-101.com/how-to/data-drives/) on how to create a data drive on your Linux system.
10. Backup your Home Directory
Once your system is setup and cleaned out the way you like it, you should backup your home directory. (This is not a full system image backup)
- Click on the Menu button and find the program Grsync
- Example below and select all the boxes shown
- In the Source Box find your Home Directory and make sure to put / at the end. Very important!!!
- Next in the Destination Box select the Drive you want to store the backup to. Use a external thumb or hard drive.
- Now select the Tab Extra Options and check the box Run as superuser.
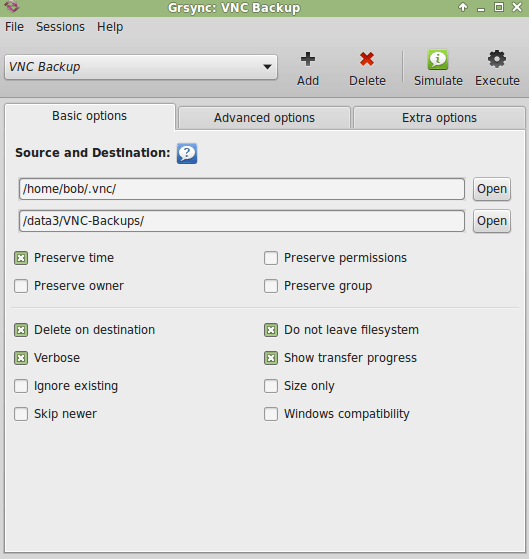

Note: Don’t forget the / at the end on the directory name. Example: /home/bob/
You have a backup of your home directory with all your programs preferences along with the fstab file and list of all the programs installed on your system. So in case your hard drive dies, you can copy all your files in your Home Directory back to a new Drives Home Directory and then re-install your system, then re-install your program list with the Backup Tool and your 100% back up and running with all your programs already configured.
Warning: The next 2 changes are optional and you need to back up your system with a Image Backup before making any changes.
11. Disable Hibernation (suspend-to-disk)
Unfortunately, hibernation (suspend-to-disk) is enabled by default in Linux Mint. This aggressive power saving mode leads to problems: your computer may experience malfunctions or even enter a coma. It’s therefore best to disable hibernation.
You can disable hibernation (suspend-to-disk) like this:
Type (or copy/paste):
sudo apt-get install gksu
Press Enter and submit your password. Please note that the password will remain invisible, not even asterisks will show, which is normal.
Leave the terminal window open for the actual hack.
2. Copy/paste the following line into the terminal (use copy/paste to prevent typo’s):
sudo touch /etc/polkit-1/localauthority/90-mandatory.d/disable-hibernate.pkla
Press Enter.
3. Copy/paste the following line into the terminal (use copy/paste to prevent typo’s):
Mint 17 Cinnamon users copy and paste:
gksudo nemo /etc/polkit-1/localauthority/90-mandatory.d/disable-hibernate.pkla
Mint 17 XFCE users copy and paste:
gksudo gedit /etc/polkit-1/localauthority/90-mandatory.d/disable-hibernate.pkla
If your using a different distro then substitute nemo or gedit with the name of your text editor.
Press Enter.
4. Copy and paste the following blue text into that empty text file:
[Disable hibernate (upower)]
Identity=unix-user:*
Action=org.freedesktop.upower.hibernate
ResultActive=no
ResultInactive=no
ResultAny=no
[Disable hibernate (logind)]
Identity=unix-user:*
Action=org.freedesktop.login1.hibernate
ResultActive=no
[Disable hibernate for all sessions (logind)]
Identity=unix-user:*
Action=org.freedesktop.login1.hibernate-multiple-sessions
ResultActive=no
Save the text file and close the text editor.
5. Reboot your computer (full reboot). Hibernation should now no longer be one of the options in the shutdown menu.
6. On a laptop, it’s advisable to check the power manager settings: you’ll have to select alternatives for hibernation….
12. Change Display Drivers
- Click on the Menu button and go to System or Administrator, click on Driver Manager then enter your password.
- By default your display driver uses the xserver-xorg-video-nouveau. If available, click on the driver that says Recommended
- NOTE: Some times this can mess your system up so you will not be able to boot back into your Desktop. So Backup your System….