Install Mint alongside Windows
Were going to be installing Linux Mint alongside Windows using 4 partitions instead of the 3 you would normally use with Grub as the bootloader.
Make sure you make a BACK UP YOUR SYSTEM, just in case things go wrong.
This article makes the assumption that you already know how to install a Linux distro and know how to use UNetbootin to make a Live CD or USB drive. If not see How to make USB disc’s and How to install Mint.
Using UNetbootin either on a Windows or Linux Mint box, make a bootable live CD or USB drive. Now boot from your new CD or USB drive you just created. Once it has fully loaded you will have a live Mint distro up and running.
Now you will need to make some room on your hard drive. One way you can do this.
- Once booted into your live distro, goto your System or Administrator from the Menu and open Gparted
- Don’t touch the NTFS partition that say’s SYSTEM RESERVED and is about 100 to 300 MB in size. This is the Windows boot partition. See below.
- Re-Size the other NTFS partition that is anywhere from 50 GB up into the terabytes in size. Give yourself a least 25 GB of disc space to install your new Linux distro. After you hit apply and it finish’s you should not see some free space on your drive.

Normally you would have the 3 following partitions with a fresh install
Exp:
- / (root)
- /swap (swap partition)
- /home (home directory)
Since were going to be using the Windows bootloader, we need 4 partitions so the Linux Mint installer can install the MBR and Grub to the 4th partition. Not to the Windows bootloader. Exp: Normally it would install the bootloader to the (sda partition), but we’re going to install Grub bootloader to the Exp: (sda5 partition). This makes the Linux Mint installer happy and when re-boot your machine, it will boot up your Windows system. This method does not overwrite the sda MBR on the drive.
Exp:
- /GRUBpartition make it 300 MB in size
- / (root) make it at least 15 GB
- /swap (swap partition) make it same size of memory you have. If you have 4 GB make it a 4 GB swap
- /home (home directory) make it at least 5 GB
Now click on free space then click on Add and create a extended partition.
- Next click on the unallocated under the newly created extended partition, then click on Add again and make a /GRUBpartition (boot partition) minimum size should be 10 – 15 GB
- Next click on the unallocated then click on Add again and make a / (root partition) minimum size should be 10 – 15 GB
- Next click on the unallocated then click on Add again and make a /swap (swap partition) minimum size should be 2 – 4 GB depending on how memory you have in your machine.
- Next click on the unallocated then click on Add again and make a /home (home partition) minimum size should be 3 – 10 GB
The numbers will different on your machine but this gives you an idea on how to set this up.
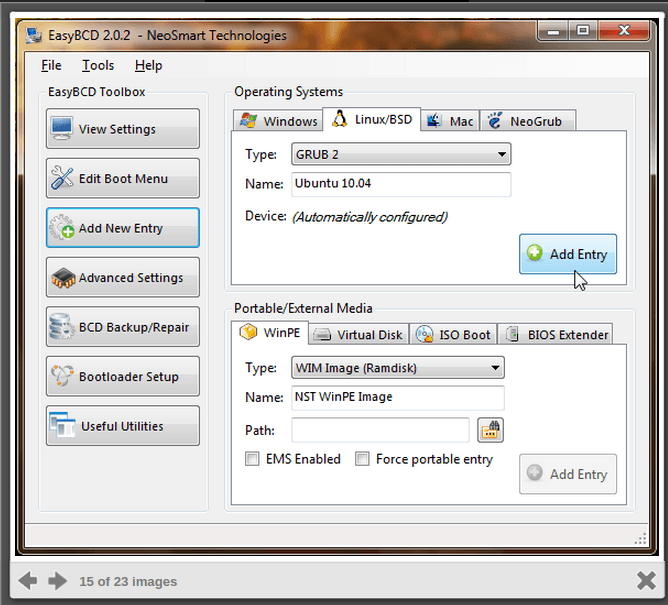
Once your install is done, reboot your machine and you should boot into your Window system. Now go and download the EasyBCD program and install it on your Windows Machine.
Next run the EasyBCD program.
At this point, go to the “Add Entry,” select “Linux,” and then select “GRUB2″ from the drop-down menu. Give it a descriptive name if you so desire and click the Add Entry button when you’re done.
Now goto the “BCD Deployment” page in EasyBCD, and select “Install the Windows Vista/7 Bootloader to the MBR” then press “Write MBR”:

Now reboot your machine and when the boot menu comes up you can select which OS you want to boot.
Enjoy
If you have any questions us the contact us page.