Windows 10 Basics Session 2
File Explorer is getting better with age
New File Explorer
The File Explorer program was called Windows Explorer in early versions of Windows. The new File Explorer in Windows 10 has noticeable changes. There are plenty of new tools but the basic layout and functionality will be familiar to anyone who has used Windows XP or later.
![]()
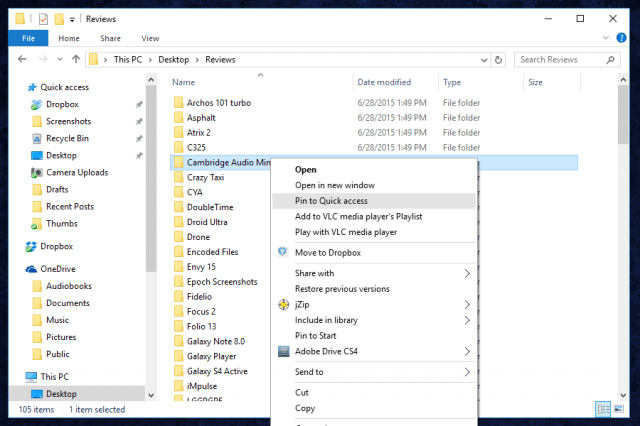
Quick Access
The Quick Access is the default and the first section of the Navigation Pane in the left-hand column, basicly it’s a Bookmarks bar for File Explorer. It shows both your most recently-accessed folders and pinned folders (bookmark), folders that you manually assign to this area to quickly get to from any folder in Windows. Do this with any folder in Windows right-click or long-press any folder on any screen, then click Pin to Quick access.
Ribbon interface
File Explorer user interface is dedicated simply to displaying icons and the tree view on the left side, because opening and moving files and folders is what you’ll be doing 90% of the time.
Advanced functions are available in the ribbon interface which you can open by clicking Home, Share, or View. You can make this area visible at all times by clicking the down button next to the folder name in the window header, then de-selecting Minimize the Ribbon.

View Tab
View tab is where more interesting tools are located. Here you can enable or disable the Navigation pane (where the Quick Access section is) and show or hide separate panes for Preview (which will show larger versions of things like photos or videos) and Details (which show more technical aspects of a file or group of files at a glance). In the Layout section, you can select entirely different views for this specific folder. Advanced tools are available by clicking the “Options” icon, then clicking “Change folder and search options.” Try out all of the different view options – you may find that some of them are very useful, especially in folders with large amounts of files.

File Explorer
File Explorer has handy tools for power users. Starting with Command Prompt and Windows PowerShell tools, the File menu will let you open new instances with the current folder already active (which can save a lot of tedious typing). Need administrator privileges just hover over the icon, then click “Open command prompt/Windows PowerShell as administrator.”

Picture tools
File Explorer basic photo tools, but they’re hidden by default. Open a folder with photo files inside, then click on one. A new yellow tab, “Picture tools,” will appear above the “Manage” ribbon tab. Click it, and you can quickly access tools to rotate a photo left or right, start a slideshow with the default photo viewer, or set a photo as your desktop background.

Search Tool
The search bar, like most modern Internet browsers. It’s an integrated part of Windows, but when you use the Search function in File Explorer itself, your search will be limited to the folder you currently have open (plus any files contained in folders inside that folder).
It’s especially useful when you have dozens or even hundreds of files in a folder. Just start typing in the Search bar and matching results will be shown. Certain file types, like Word documents, will also be displayed if your search query matches any of the content inside of the file. If you’re not sure where exactly one of your search results is located, right-click it and select “Open file location” to instantly open the relevant folder.
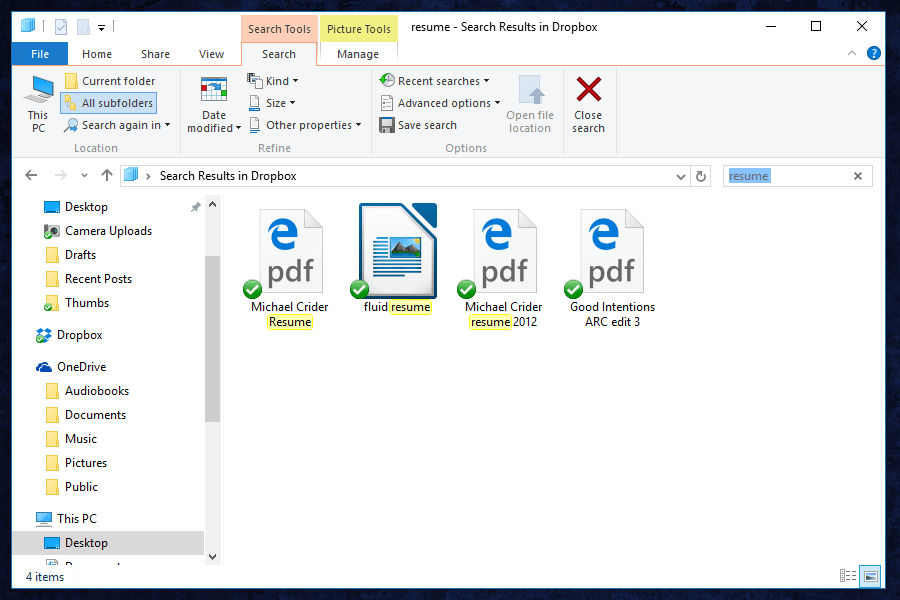
File Explorer search doesn’t have all the functionality of a full Cortana search. You can’t search for “word documents from December,” for example (well, you can, but you won’t receive relevant results).
Useful keyboard shortcuts
There are many more keyboard shortcuts that are shown here, but here are some of the most useful:
- Alt + P – show or hide the Preview pane
- Alt + Shift + P – show or hide the Details pane
- Windows key + E – open a new instance of File Explorer from anywhere in Windows
- Alt + left arrow key – go back one folder in your history
- Alt + up arrow key – go up one folder in the folder tree
- Ctrl + N – open a new File Explorer window
- Ctrl + E – activate the Search bar
- Ctrl + Shift + N – create a new folder in the current folder
- Ctrl + mouse wheel up or down – increase or decrease the size of icons and thumbnails.
- Crtl + P will bring up the Print screen
- Crtl + C (first highlight the text you want to copy)
- Crtl + V (click where you want to paste to)
- Windows Key-Tab (Task View)
- Windows Key-Right-Up (moves app to top right quadrant; you can use different directions to position windows where desired)
- Windows Key-Up and Down (snap apps to top or bottom of screen or maximizes)
- Windows Key-Ctrl-Left or Right (scrolls between virtual desktops)
- Windows Key-Ctrl-D (creates a new virtual desktop)
- Windows Key-Ctrl-F4 (closes virtual desktop)
- Windows Key-Ctrl-C (Cortana listening)
- Windows Key-S (Daily Glance for weather, news, sports)
- Windows button + Func key + PRTSC this takes a Screenshot. (Saved in the Pictures – Screenshot folder)
- Old feature but finally back in Windows
How to Take Screenshots Using Default Tools in Windows 10
Keyboard Shortcut button – Windows + ALT + PrtScn
When you use the combination of Windows + Alt + PrtScn keys on your keyboard, the whole display on the screen will be captured at a time. Windows will automatically save the captured images in the Screenshots folder of Pictures. You will see that the entire screen will slightly become dark when you press both the keys.
Edge The New Browser in Windows 10

Edge does more then just surf the web. Some of the new things it can do are:
- Doodle, write and type notes directly on web pages with Web Note
- Cortana makes your life easier with instant search results without leaving the page
- With Reading View, you can clear distracting content out of your way
Plus a lot more.
Settings
Boomarks
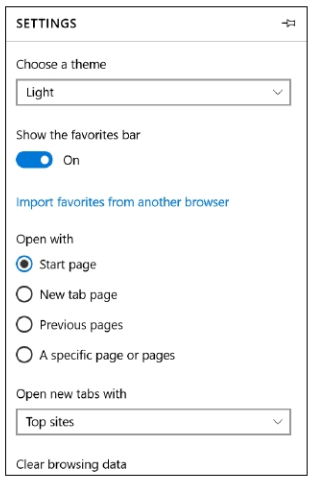
First you want to make sure you have the favorites bar turned on. Use the slider to turn that on.
In this Settings box at the right you can change your homepage if you want something different than the
Start page it opens with.
Change your search engine if desired:
Go to the home page of the search engine you want to use: Example www.google.com
Open settings again, then click on Advanced Settings. The you’ll see “Search in the address bar with Bing. Click Add New, click Google then Add as New. Drop down Bing then choose Google.
If you want to import your favorites from other Browsers like iExplorer, Firefox and Chrome. From within Settings just click on the “Import favorites from another browser” and follow it step by step.
Bookmarks saves your favorite websites for quick access. Microsoft Edge, similar to other browsers such as Firefox, Opera, or Chrome allows you to save the favorite pages for further access.

Go to the favorite URL or search for a website you want to bookmark. Navigate to a page and click the Star icon top-right of the Edge browser window. Name the bookmark and choose the folder where you want to save it.
You can also create a folder and name it according to your needs. Click “Create new folder”, name it, then click “Add” (see above). The Star icon should turn to yellow.
You can eliminate or change the details of the previously set bookmark by clicking on the yellow Star button.
In order to save bookmarks on the Favorites bar, you should enable it. Click on the “…” icon top-right side and go to Settings. Set the Favorites bar “ON”.
If you want to manage all your bookmarks, click on Hub (top-right, next to the Favorites star). From the Hub, you can access or modify your bookmarks. To change or remove, right click a bookmark or a folder.
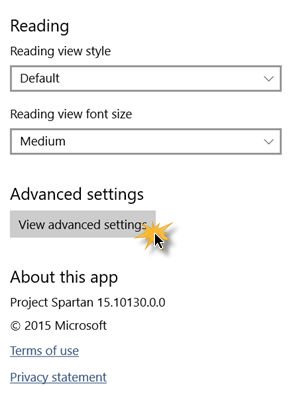
Clicking on Advanced Settings towards the end of the Settings screen will open up more options.
Under Advanced Settings section you can add a Home button, enable or disable Adobe Flash player and turn on Caret Browsing. The browser even protects you from malicious sites and downloads if you have the Smartscreen filter option enabled. The feature is enabled by default. Page Prediction another addition, helps in predicting the contents of the web pages as they load. Under Manage my saved passwords section, you can add, edit or remove the credentials from within the manager.

Under Advanced Settings section you can add a Home button, enable or disable Adobe Flash player and turn on Caret Browsing. The browser even protects you from malicious sites and downloads if you have the Smartscreen filter option enabled. The feature is enabled by default. Page Prediction another addition, helps in predicting the contents of the web pages as they load. Under Manage my saved passwords section, you can add, edit or remove the credentials from within the manager.
Here you can:
- You can enable or disable Flash Player
- Set Privacy options
- Opt to use Caret browsing
- Opt to save form entries
- Choose to block pop-ups and Cookies
- Manage protected media licenses
- Send Do Not Track requests
- Use Page prediction
- Enable or disable SmartScreen Filter
- On or Off Cortana integration
- Manage Saved passwords
- Read: Privacy settings in Edge browser
An additional option to help you avoid an accidental closure of work in progress. While you may not be able to launch more than one instance of Edge via the taskbar, you can launch a new instance within the Edge browser. All a user has to do is simply hit the Settings button and select “New window.” This will open up a new instance of the browser.
New Draw Feature in Edge
Microsoft Edge is the only browser that lets you take notes, write, doodle, and highlight directly on webpages. Then you can save and share your handiwork in all the usual ways. Make notes on recipes, send your partner “subtle hints” about birthday gifts, or just draw mustaches on celebrities—the web is your canvas.
Select Make a web note to start adding to the page you’re on.


1. Pen 2. Highlighter 3. Eraser 4. Add a typed note 5. Clip
Changing Laptop Power Options
Right mouse click on Menu button

In the Left Column select
Choose What Closing the Lid Does

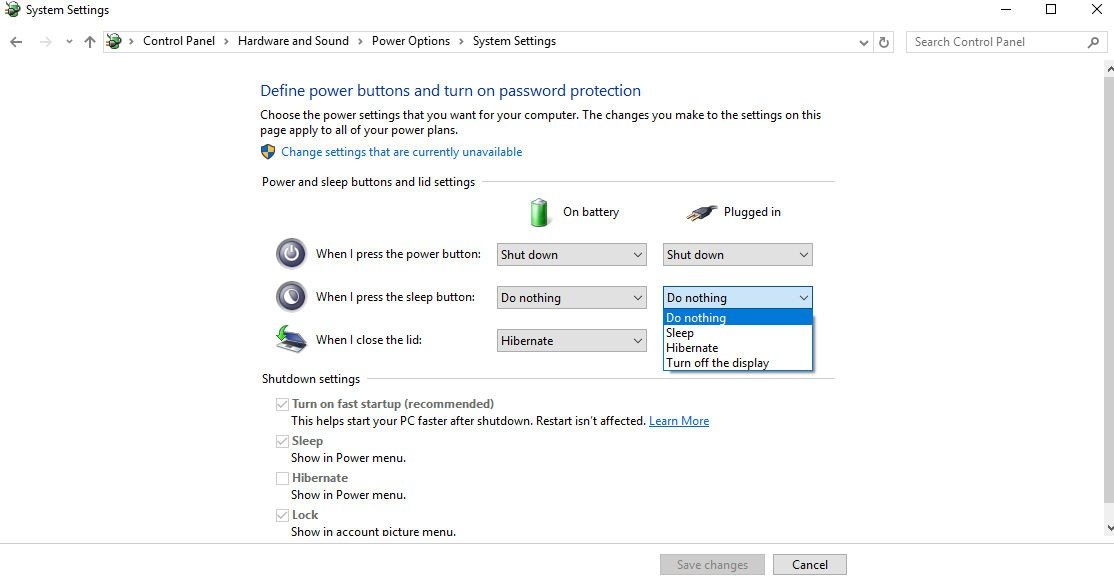

You have 3 different power options here. These are your choices.
When I press the Power Button
When I press the Sleep Button
When I Close the Lid
Each has the option for when your on Battery power or have the AC charger plugged in.
Some of the options are as follows
Do nothing
Sleep
Hibernate
Shut down
Turn off the display
Do nothing of course does nothing
Sleep mode All actions on the computer are stopped, any open documents and applications are put in memory while the computer goes into a low-power state. The computer technically stays on, but only uses a bit of power.
Hibernate mode is very similar to sleep, but instead of saving your open documents and running applications to your RAM, it saves them to your hard disk. This allows your computer to turn off entirely, which means once your computer is in Hibernate mode, it uses zero power.
Shut down just turns off your computer but does not save any programs or data you may have open at the time.
Turn off the display, means just that.
When your all done, click on Save Changes and it’s done.
Window 10 Basics 3
References for this article.