General

Increase your network security – Deploy a honeypot
Deploying a honeypot system on your internal network is a proactive measure that enables you to immediately detect an intruder before any data is damaged or stolen.
Have you ever wondered how a hacker breaks into a live system? Would you like to keep any potential attacker occupied so you can gather information about him without the use of a production system? Would you like to immediately detect when an attacker attempts to log into your system or retrieve data? One way to see and do those things is to deploy a honeypot. It’s a system on your network that acts as a decoy and lures potential hackers like bears get lured to honey. Honeypots do not contain any live data or information, but they can contain false information. Also, a honeypot should prevent the intruder from accessing protected areas of your network. A properly configured honeypot should have many of the same features of your production system. This would include graphical interfaces, login warning messages, data fields, etc. An intruder shouldn’t be able to detect that he is on a honeypot system and that his actions are being monitored.
Benefits of a honeypot system
Many organization wonder why they should spend money and time setting up a system that will attract hackers. With all the many benefits of a honeypot, however, the real question should be why you have not already set one up. A honeypot’s most significant value is based on the information that it obtains and can immediately alert on. Data that enters and leaves a honeypot allows security staff to gather information that is not available from an intrusion detection system (IDS). An attacker’s keystrokes can be logged during a session, even if encryption was used to establish it. Also, any attempts to access the system can trigger immediate alerts. An IDS requires published signatures to detect an attack, but it will often fail to detect a compromise that is not known at the time. Honeypots, on the other hand, can detect vulnerabilities based off the attacker’s behavior that the security community may not be aware of. These are often called zero-day exploits. The data collected by honeypots can be leveraged to enhance other security technologies. You can correlate logs generated from a honeypot with other system logs, IDS alerts and firewall logs. This can produce a comprehensive picture of suspicious activity within an organization and enable more relevant alerts to be configured that can produce fewer false positives. Another benefit of a honeypot is that once attackers enter the system, it can frustrate them and cause them to stop attacking the organization’s network. The more time spent in the honeypot means less time spent on your production system.
Design and operation of a honeypot
There are variety of operating systems and services a honeypot can use. A high-interaction honeypot can provide a complete production-type system that the attacker can interact with. On the other end is a low-interaction honeypot that simulates specific functions of a production system. These are more limited, but they’re useful for obtaining information at a higher level. In my experience, the high-interaction honeypot is the most beneficial because it can completely simulate the production environment. However, it requires the most time to deploy and configure. It is critical to have proper alerting configured for your honeypot. You should have logs for all devices in the honeypot sent to a centralized logging server, and security staff should be paged whenever an attacker enters the environment. This will enable staff to track the attacker and closely monitor the production environment to make sure it is secure. It is important your honeypot system is attractive to a potential attacker. It should not be as secure as your production system. It should have ports that respond to port scans, have user accounts and various system files. Passwords to fake accounts should be weak, and certain vulnerable ports should be left open. This will encourage the attacker to go into the honeypot environment versus the live production environment. Attackers typically attack the less secure environment before going to one that has stronger defenses. This allows security staff to learn how hackers bypass the standard controls, and afterwards they can make any required adjustments. You can deploy a physical or virtual honeypot. In most cases, it is best to deploy a virtual honeypot because it is more scalable and easier to maintain. You can have thousands of honeypots on just one physical machine, plus virtual honeypots are usually less expensive to deploy and more easily accessible.
Honeypot on internal network protects against insider threats
Honeypots can also protect an organization from insider threats. According to the 2016 Cyber Security Intelligence Survey, IBM found that 60% of all attacks were carried by insiders. A honeypot should be deployed within your internal network and only a minimal number of employees should know the system exists. Internal deployment is preferred over external due to the larger number of attacks carried by insiders and the fact that many hackers prefer to establish command-and-control servers for communication to compromised servers on the internal network. Honeyd is an open-source tool used for creating honeypots. It is a daemon that can be used to create many virtual hosts. You can configure each host differently and run a variety of services on them. They can be configured to run on different operating systems. You can set up real HTTP servers, FTP servers and run Linux applications on it. It is also enables you to simulate various network topologies. Honeypots have been used mostly by researchers to study the tactics and techniques of attackers. But as I explained earlier, they can be very useful to defenders as well. It is time for more organizations to consider using them as a proactive way to protect their network. The benefits of deploying them far outweigh the costs for organizations that manage a significant amount of sensitive data. Read More

10 Major Updates In Ubuntu 17.10 Artful Aardvark
20/10/2017
What’s New In Ubuntu 17.10 “Artful Aardvark”?
1. GNOME is the default Desktop
2. Wayland is the default display server
3. Linux Kernel 4.13
4. Dock

Install Wine And Run Windows Apps in Linux
How to install Wine in Linux?
Or you can follow the steps below to install from the PPA.
Install Wine on Fedora or Derivatives
dnf install winehq-stableDevelopment branch
dnf install winehq-develStaging branch
dnf install winehq-staging
Install Wine on Ubuntu or Derivatives
sudo apt-key add Release.key
sudo apt-add-repository https://dl.winehq.org/wine-builds/ubuntu/
sudo apt-get update
sudo apt-get install –install-recommends winehq-stableDevelopment branch
sudo apt-get install –install-recommends winehq-develStaging branch
sudo apt-get install –install-recommends winehq-staging

Timeshift System Restore Utility
How to install Timeshift in Linux?
For Ubuntu and Ubuntu based distros such as Mint
sudo apt-get update
sudo apt-get install timeshift
Keywords:
System Restore Utility, System Restore Utility Programs, System Restore Utility Software, What Is A System Restore Utility, What Is System Restore Utility
Best Free and Open Source Alternatives to Adobe Products for Linux
Adobe provides a number of applications under Adobe Creative Suite, now under Adobe Creative Cloud. It’s not just limited to Photoshop but contains various other software that helps primarily in Web design, logo making, video editing, pdf editing and more.
However, Adobe Creative Suite is a proprietary software costing you a good amount of your money and if you are a Linux user, even if you are willing to spend that money, it’s not available for your OS.
In this article, we are going to cover some of the best Adobe products alternative for Linux.
Best Adobe alternatives for Linux
If you are not in a mood of reading the article, you can watch this video from our YouTube channel. Do subscribe to our YouTube channel for more Linux related videos.
I have included one non-FOSS item in this list. This is because I really couldn’t find a decent alternative to Adobe Acrobat in Linux.
For the rest, here we go!
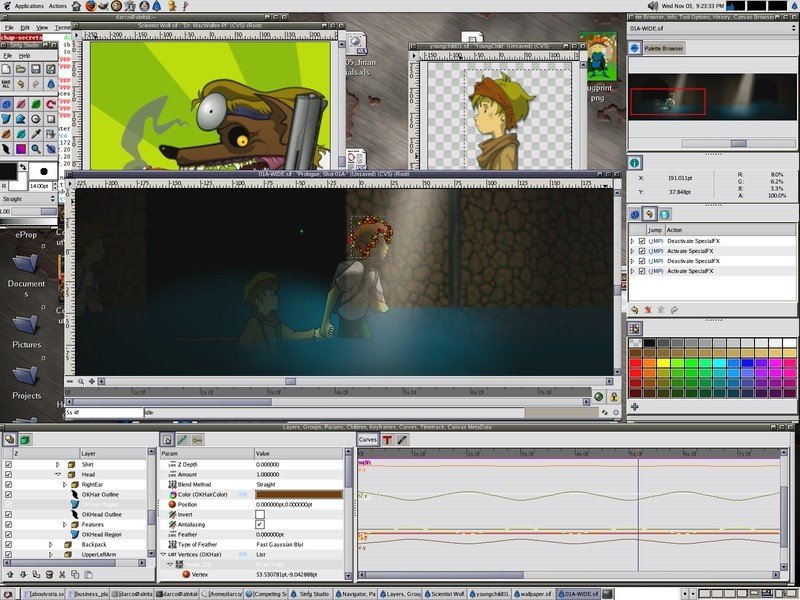
1. GIMP: Alternative to Adobe Photoshop

Adobe Photoshop is the most popular and widely used graphics editing tool both for regular and professional users. It’s an excellent tool for photo editing, website design, and graphics creation.
When it comes to an alternative to Adobe Photoshop, GIMP provides the best replacement.

Linux File System Structure Explained
For me, the biggest difference between the two file systems is to understand where the root of the file system begins. In Windows, the root begins at the drive letter, usually C:, which basically means it begins at the hard drive. In Linux however, the root of the filesystem doesn’t correspond with a physical device or location, it’s a logical location of simply “/”. See the graphics below for a visual representation.
Linux File System Structure Tree

Windows File System Tree

Another thing to remember is that in Linux, everything is a file. Or, more accurately, everything is represented as being a file, while in Windows it may be displayed as being a disk drive.
For example, in Windows the hard drive is typically represented as C: in the file explorer, and it will even display a little icon of the hard drive and display how much space is being used. In Linux, on the other hand, the hard drive as represented merely as /dev/sda, which is really just a folder/directory, which in Linux is really just a file that points to other files.
So let’s take some other more practical examples. The Linux equivalent of your Documents folder in Windows would be /home/username/Documents, whereas in Windows it’s typically C:UsersUserNameDocuments. These are actually pretty similar, but you can see where the differences lie.
Linux File System Types, Linux File System Structure, Linux File System Explained, Linux File System Permissions, Linux File System Layout, Linux File System Encryption, Linux File System User Space
NEMO 3.4 WITHOUT CINNAMON DEPENDENCIES AVAILABLE IN PPA FOR UBUNTU 17.04 AND 16.04
Update: the article initially mentioned Nemo 3.2. The PPA now provides Nemo 3.4 for Ubuntu 17.04, 17.10 and 16.04 (Ubuntu 16.10 is no longer supported by Canonical, so Launchpad doesn’t allow uploading new packages for it).
To make it easy to go back to Nemo 2.8.0 for Ubuntu 16.04 users in case something doesn’t work properly (because there were quite a few under the hood changes in Nemo), I decided to upload the latest Nemo 3.4 to a new PPA.

- dual pane (can be enabled from the View menu or using the F3 key)
- unified, configurable toolbar (you can show or hide the up, next, home, open in terminal, new folder, search button and more);
- built-in actions, scripts and extensions manager;
- treeview sidebar option;
- re-worked statusbar with zoom controls, free space info, as well as options to toggle displaying the places sidebar, treeview or completely hide the sidebar;
- the main toolbar, menubar, and statusbar can be hidden;
- built-in “Open as root” and “Open in terminal” context menu items;
- “Set as Wallpaper” context menu for images;
- sidebar: indicators under each drive, displaying the free/used space;
- improved the Open With dialog;
- option to resize individual desktop icons;
- much more.
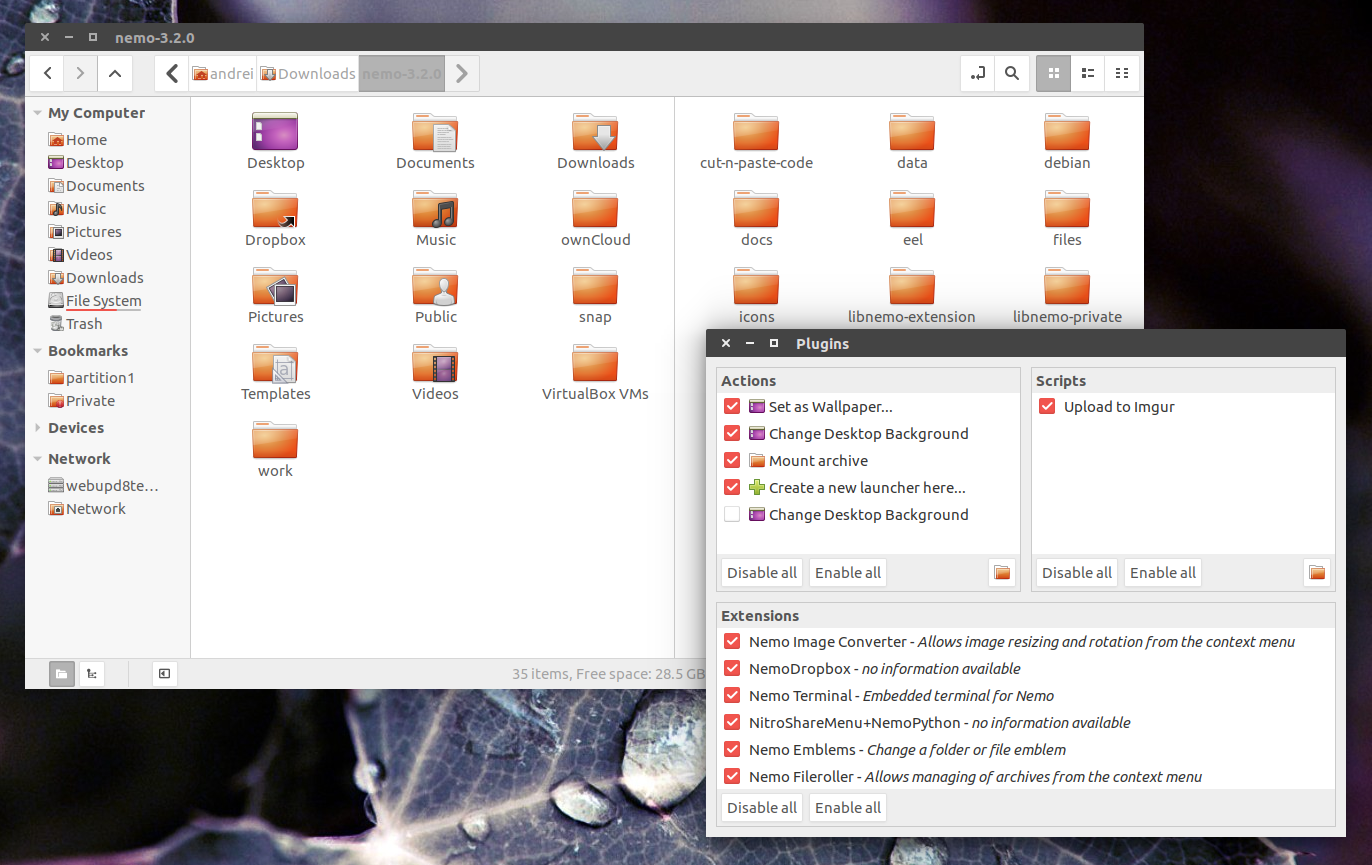 |
| Nemo 3.2.0 with two panes and plugin manager |
Nemo has received quite a few improvements since version 2.8.x (which is available in the WebUpd8 Nemo PPA), such as:
- option to choose on which monitor to show the desktop folder (icons). This can be changed via Dconf Editor (org > nemo > desktop > desktop-layout), and can be set to show desktop icons on primary monitor, on remaining monitors, or on all monitors (default is primary only).
- fixed wrong desktop size with GTK 3.20;
- re-enabled desktop type-to-select feature;
- option to double-click empty area to go to parent directory (can be enabled in the Nemo Preferences, under Behavior);
- only append .desktop to desktop files when they actually need it. Trusted desktop files (ones that typically get made and placed on the desktop) don’t show their extension, so when you try to rename them, the new name needs .desktop appended to it;
- many other improvements and bug fixes.
For a complete Nemo changelog, see THIS page.
Install Nemo 3 with Unity patches and without Cinnamon dependencies in 17.04, 17.10 or 16.04
sudo add-apt-repository ppa:webupd8team/nemo3
sudo apt update
sudo apt-get install nemo nemo-fileroller

Please note that if you already have an older Nemo version installed, upgrade to the latest Nemo version, Run the following command to do so:

sudo apt-get update
sudo apt-get upgrade
killall nemo
Important: if you’re upgrading from an older Nemo version and you had Nemo set to draw the desktop, you’ll have to either logout/login or run “nemo-desktop” manually. This is only required once after updating – that’s because the executable used to draw the desktop is now “nemo-desktop” instead of “nemo”.
Optional: set Nemo as the default file manager
gsettings set org.gnome.desktop.background show-desktop-icons false
xdg-mime default nemo.desktop inode/directory application/x-gnome-saved-search(the first command above disables Nautilus from handling the desktop, and the second command sets Nemo as the default app to open directories)
Then restart the session (logout/login) and you’re done!
How to revert the changes
To revert the changes, use Nautilus to draw the desktop instead of Nemo:
gsettings set org.gnome.desktop.background show-desktop-icons trueAnd set Nautilus back as the default file manager:
xdg-mime default nautilus.desktop inode/directory application/x-gnome-saved-searchTo remove the PPA and all the Nemo packages (including the Nemo extensions), use:
sudo apt remove nemo nemo-*
sudo rm /etc/apt/sources.list.d/webupd8team-nemo-*.list

Read More Should Read Also


For Ubuntu 17.10 I found this seems to work a lot better

To install Nemo (3.4.7) File Manager in Ubuntu open Terminal (Press Ctrl+Alt+T) and copy the following
sudo add-apt-repository ppa:noobslab/nemo3
sudo apt-get update
sudo apt-get install nemo
Install Extensions for Nemo using this command:
Terminal Commands:
sudo apt-get install nemo-compare nemo-audio-tab nemo-emblems nemo-filename-repairer nemo-fileroller nemo-gtkhash nemo-image-converter nemo-pastebin python-nemo nemo-rabbitvcs nemo-seahorse nemo-share nemo-terminal
To remove Nemo and PPA, Enter following commands:
Terminal Commands:
sudo apt-get remove nemo nemo-*
sudo apt-get install ppa-purge
sudo ppa-purge ppa:noobslab/nemo3
Ppa For Ubuntu 17.10, Ppa For Ubuntu, Ppa Error Ubuntu, Ppa Ubuntu Install, Ppa On Ubuntu
CREATE BOOTABLE WINDOWS USB STICK FROM LINUX

- Legacy / MBR-style / IBM PC compatible bootmode;
- Native UEFI booting is supported for Windows 7 and later images (with a limitation: only FAT filesystem can be used as the target filesystem).
- support for both wxWidgets 2 and 3;
- use pkexec instead of gksudo for privilege escalation;
- UEFI boot support;
- numerous bug fixes.
Some newer WoeUSB changes include:
- support customizing the –label of the newly created filesystem in –format mode;
- implement checking on target filesystem in –install mode;
- command line: check if target media is busy before continuing and bail out when the target partition is mounted;
- support Linux distributions that uses “grub2” as prefix name, such as Fedora;
- –install and –format installation options are deprecated in favor of –partition and –device, to be more clear what both options will do. The old options will still be available until WoeUSB v3.0;
- from now on, GRUB will pause when the ENTER key is used before starting to load Windows. This is useful if you want to see if there are errors in the GRUB loading stage.
Also, since the application name has changed, the executables have changed as well: “woeusbgui” for the GUI and “woeusb” for the command line tool.
You can see what’s new in each new WoeUSB release (there were 13 new releases for the past 2 days) on GitHub.
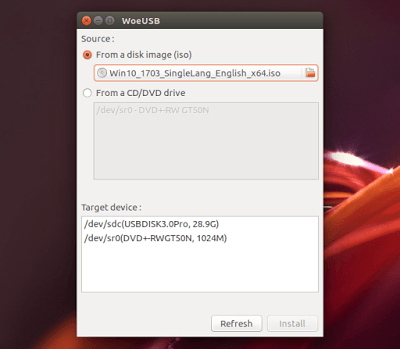
Despite the major code refactoring and numerous bug fixes, I still encountered an error using the WoeUSB GUI, which I also found in the original WinUSB. When the Windows USB stick is completed, WoeUSB displayed the following message: “Installation failed ! Exit code: 256”. This bug was closed on GitHub and it looks like it doesn’t affect the actual Windows USB stick in any way.
In my test, I was able to install Windows 10 64bit in VirtualBox (on an Ubuntu 17.04 host) despite this error.
Set Up Bluetooth in Linux
Bluetooth is still very important in the world today given that a wide range of devices rely on its protocol to perform various operations. Most laptops come with built-in Bluetooth adapters, but even if yours doesn’t, external Bluetooth dongles are cheap and plentiful in supply.
Having Bluetooth properly set up on your machine allows you to use a Bluetooth mouse, keyboard, headset or any Bluetooth accessories you might own.
Unfortunately, it’s a hit or miss in Linux. I haven’t had Bluetooth working out of the box across the range of hardware and distros I have tried.
But usually once you’ve installed a few packages and made a few tweaks, everything works flawlessly, at least that has been my experience.
So if you’ve had trouble connecting to your Bluetooth accessories from your Linux PC, this post should help.
Getting Started
First, you need to install the required packages on your computer. If you’re on Ubuntu or an Ubuntu-based distro, run the following command:
sudo apt-get install bluetooth bluez bluez-tools rfkill
Next, make sure your Bluetooth device is not blocked. You can verify that using the rfkill utility:
Bluetooth In Linux Mint, Bluetooth In Linux, Bluetooth In Linux Kernel, Enable Bluetooth In Linux, Bluetooth Linux Config, Bluetooth Enable Linux, Bluetooth On Linux Mint, Bluetooth On Linux Ubuntu, Install Bluetooth In Linux System, Bluetooth Virtualbox Linux
Install Ubuntu Linux On Windows 10 In 24 Steps
Introduction
This guide will show you how to download and install Ubuntu Linux on Windows 10 in such a way that it won’t harm Windows. (You can find uninstall Ubuntu instructions here.)
The upside to following this guide is that Ubuntu Linux will only run when you tell it to and it doesn’t require any special partitioning of your disks.
The method used to install Ubuntu is to download a piece of software called Virtualbox from Oracle which allows you to run other operating systems as virtual computers on top of your current operating system which in your case is Windows 10.
What You Will Need
In order to install Ubuntu Linux on Windows 10 you will need to download the following applications:
- Oracle Virtualbox (link tells you all about virtualbox)
- Ubuntu (links to a review of Ubuntu)
- Virtualbox Guest Additions (links to a description of guest additions)
Steps Required To Run Ubuntu Linux On Windows 10
- Download Oracle Virtualbox
- Download Ubuntu
- Download Virtualbox Guest Additions
- Install Virtualbox
- Create a Ubuntu virtual machine
- Install Ubuntu
- Install Virtualbox Guest Additions
What About Windows 7 And Windows 8 Users
Here are some alternative guides for Windows 7 and Windows 8 users
Download Oracle Virtualbox
Keywords:
How To Install Ubuntu Linux On Windows 10, Install Linux Ubuntu With Windows 10, Install Ubuntu On Windows 10 Computer, Install Ubuntu On Windows 10 Uefi, Install Ubuntu Windows 10 Usb