Posts by Bob L

Using OpenShot Video Editor
OpenShot Video Editor is an award-winning, open-source video editor, available on Linux, Mac, and Windows. OpenShot can create stunning videos, films, and animations with an easy-to-use interface and a rich set of features.
Features
- Cross-platform (Supports Linux, OS X, and Windows)
- Support for many videos, audio, and image formats (based on FFmpeg)
- Powerful curve-based Key frame animations
- Desktop integration (drag and drop support)
- Unlimited tracks/layers
- Clip resizing, scaling, trimming, snapping, rotation, and cutting
- Video transitions with real-time previews
- Compositing, image overlays, watermarks
- Title templates, title creation, sub-titles
- 2D animation support (image sequences)
- 3D animated titles (and effects)
- SVG friendly, to create and include vector titles and credits
- Scrolling motion picture credits
- Advanced Timeline (including Drag & drop scrolling, panning, zooming, and snapping)
- Frame accuracy (step through each frame of video)
- Time-mapping and speed changes on clips (slow/fast, forward/backward, etc…)
- Audio mixing and editing
- Digital video effects, including brightness, gamma, hue, greyscale, chroma-key (bluescreen/greenscreen) , and many more!
Screenshot

System Requirements
Video editing benefits from large amounts of memory, modern CPUs, and fast disks. Basically, you want the best computer you can afford when editing video. Here are the minimum system requirements:
- 64-bit Operating System (Linux, OS X, Windows 7/8/10)
- Multi-core processor with 64-bit support
- 4GB of RAM (16GB recommended)
- 500 MB of hard-disk space for installation
- Optional: Solid-state drive (SSD), if utilizing disk-caching (and an additional 10GB of hard-disk space)
Quick Tutorial
Using OpenShot is very easy, and this tutorial will take you through the basics in under 5 minutes. After this tutorial, you will be able to make a simple photo slide-show with music.
Step 1 – Import media files
Before we can begin making a video, we need to import media files into OpenShot. Most video, image, and music file formats will work. Drag and drop a few videos or images and a music file from your Desktop to OpenShot. Be sure to drop the files where the arrow in the illustration is pointing.
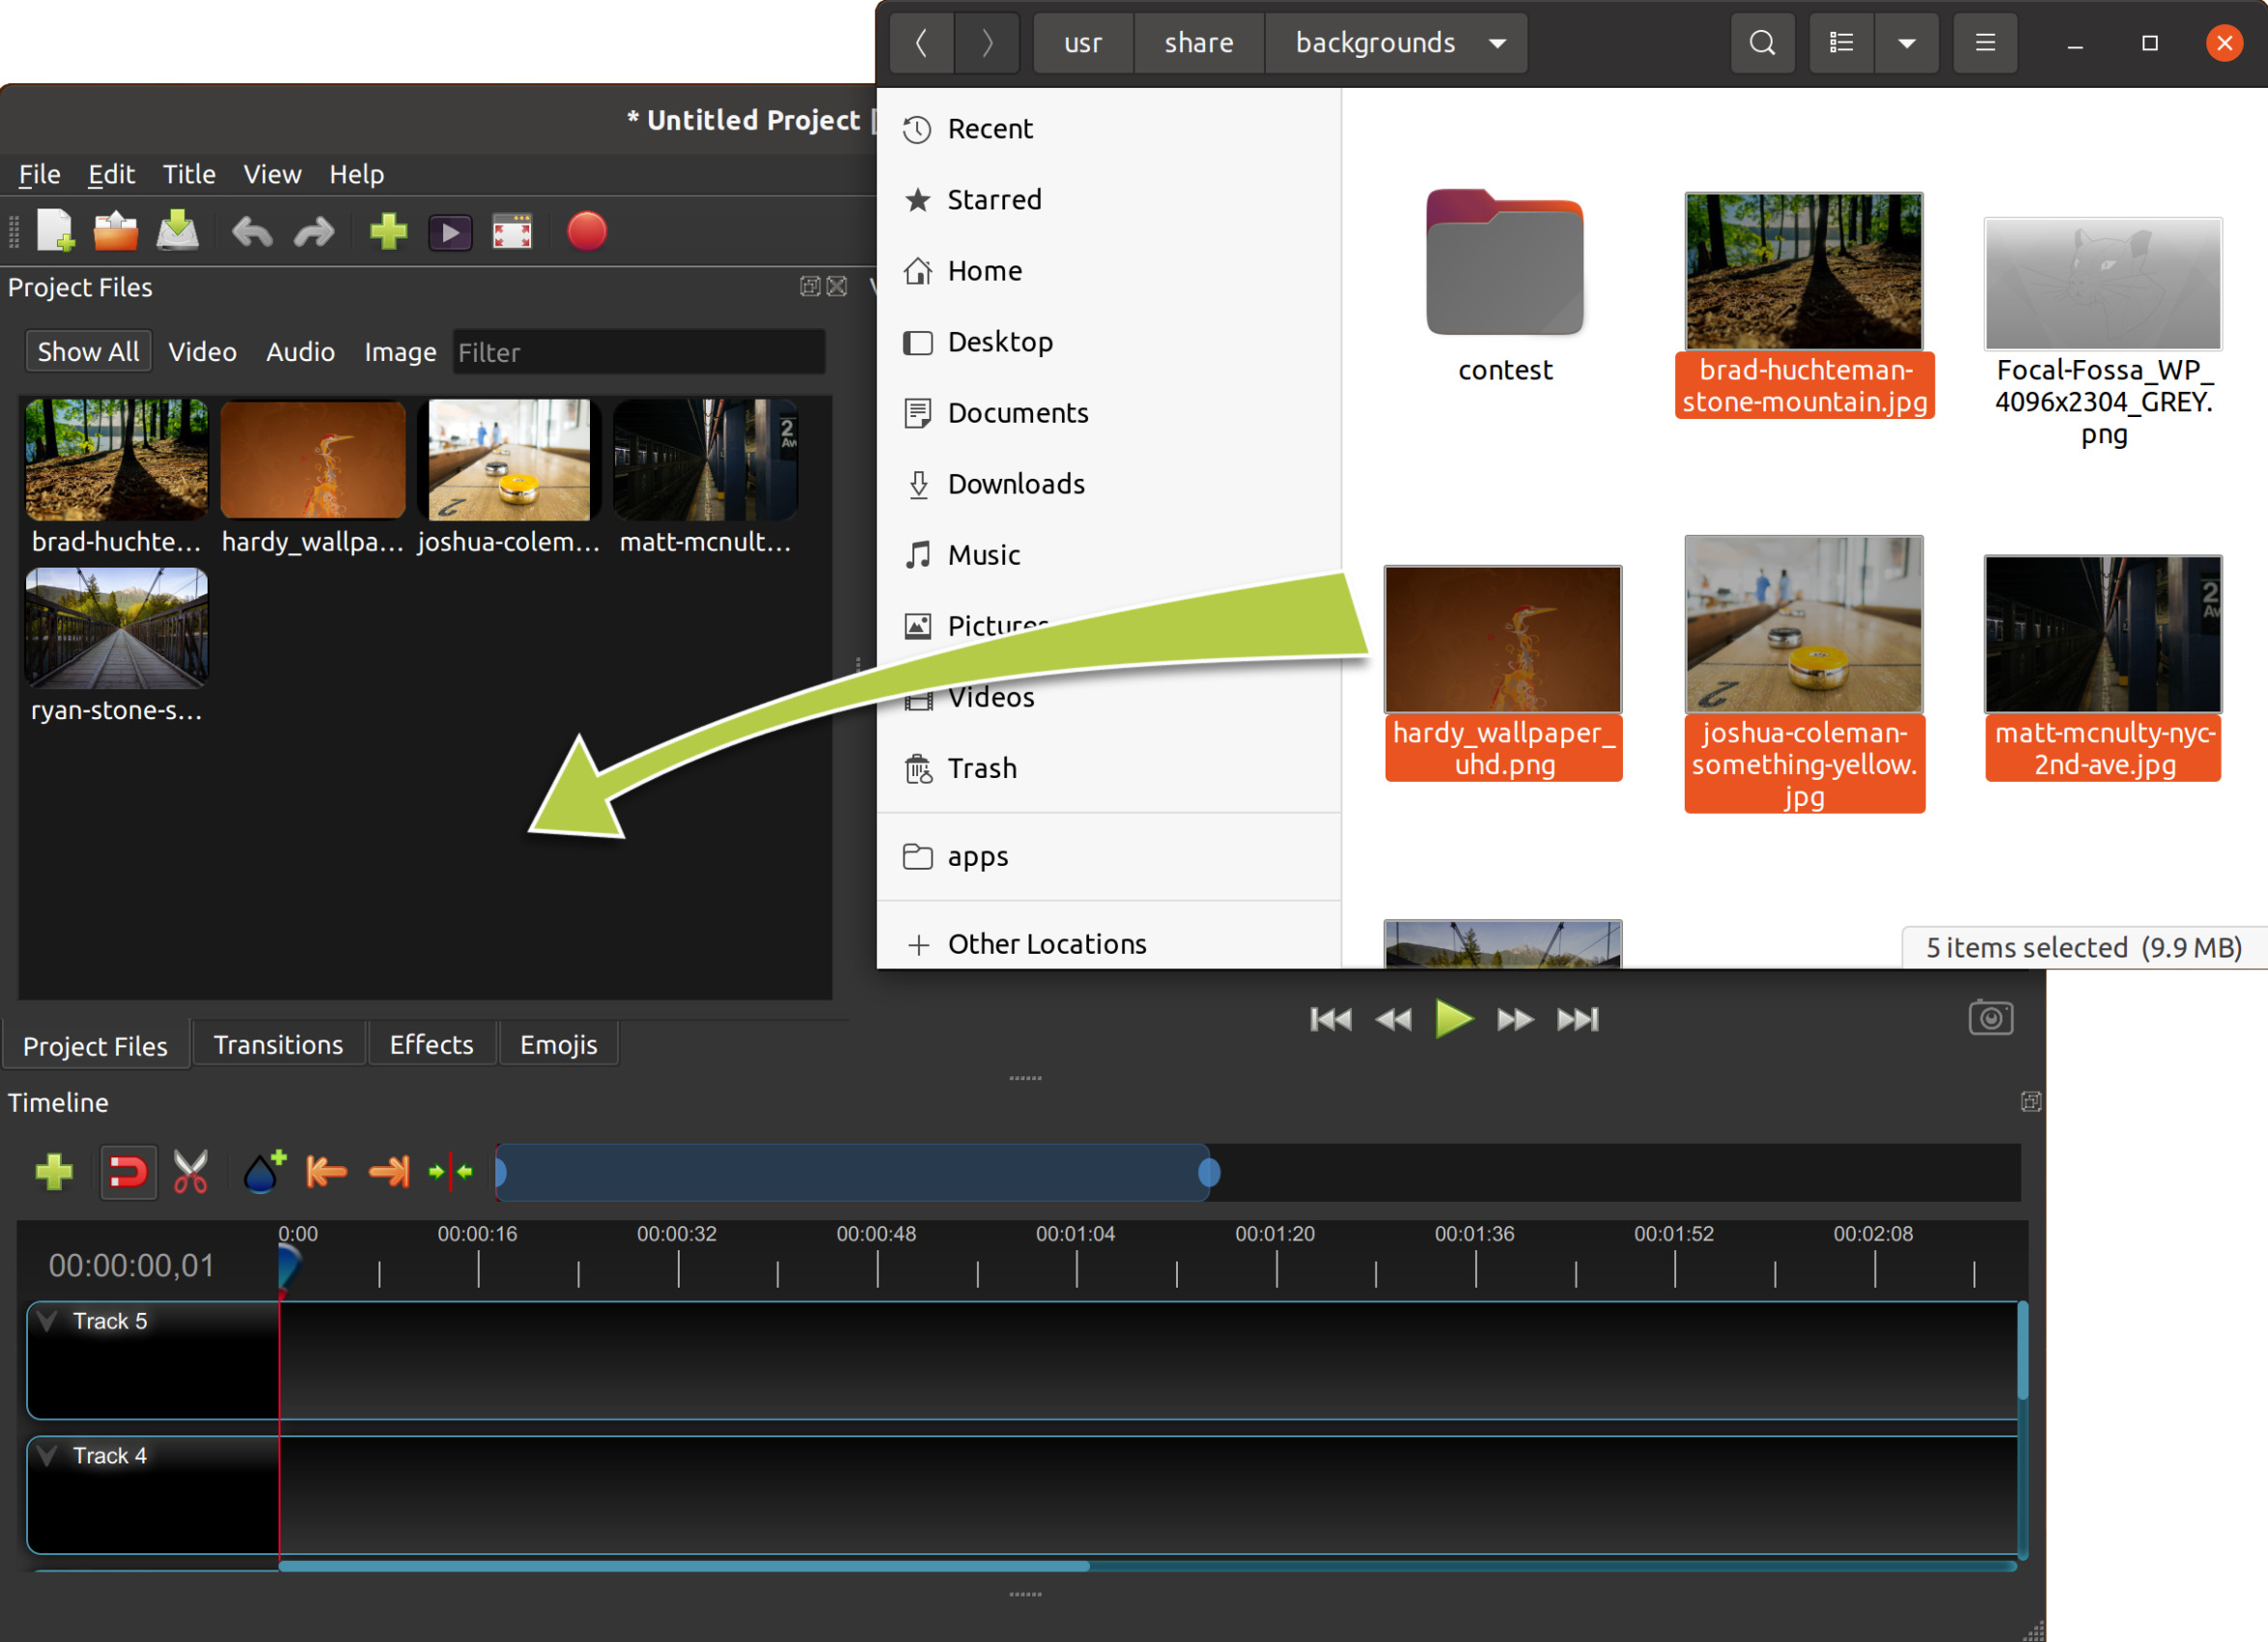 Alternative methods to add files to your projects are described in the section Import Files. The “Show All”, “Video”, “Audio”, “Image” filters above the added files allow you to only see the file types you are interested in.
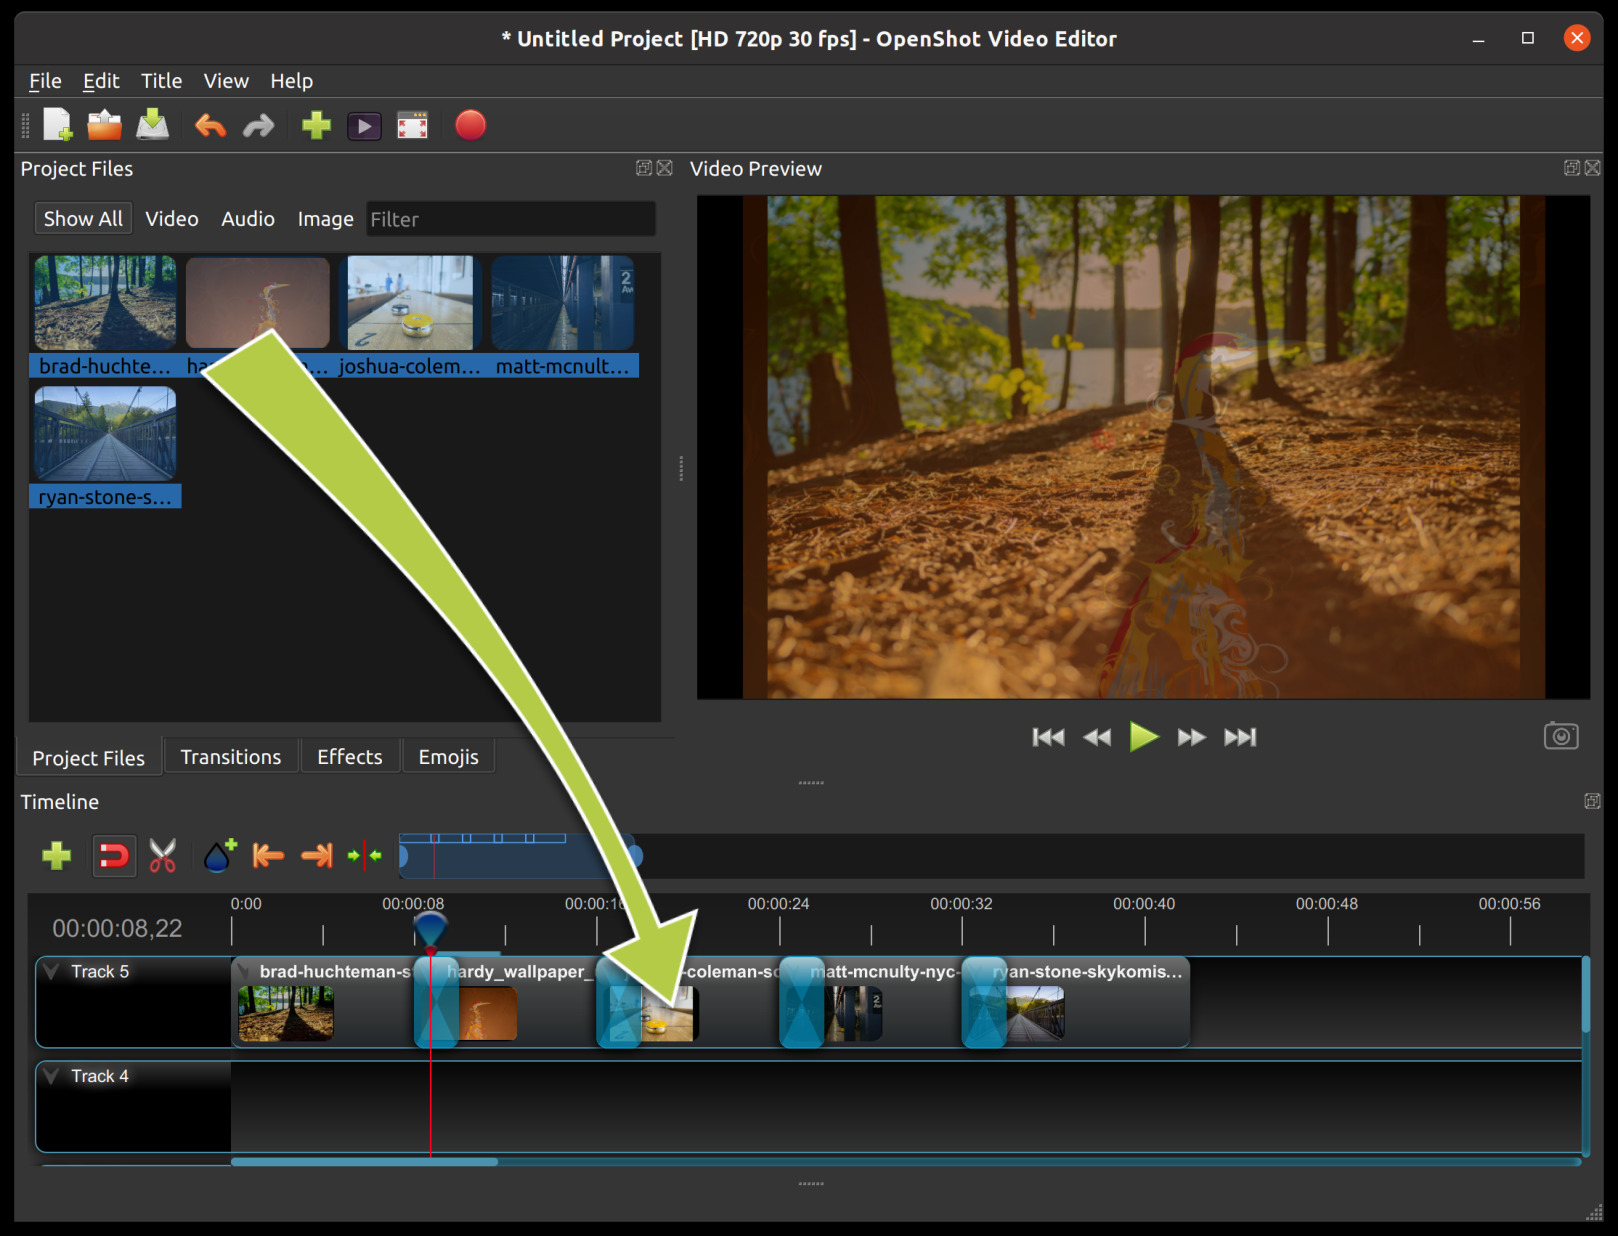
Step 2 – Arrange Videos and Photos on Timeline
Next, drag each video or photo onto a track in the timeline (as seen in the illustration). The timeline represents your final video, so arrange your photos in whatever sequence you want them to appear in your video. If you overlap two clips, OpenShot will automatically create a smooth fade between them, displayed by blue rounded rectangles between the clips. Remember, you can rearrange the clips as many times as needed by simply dragging and dropping them.
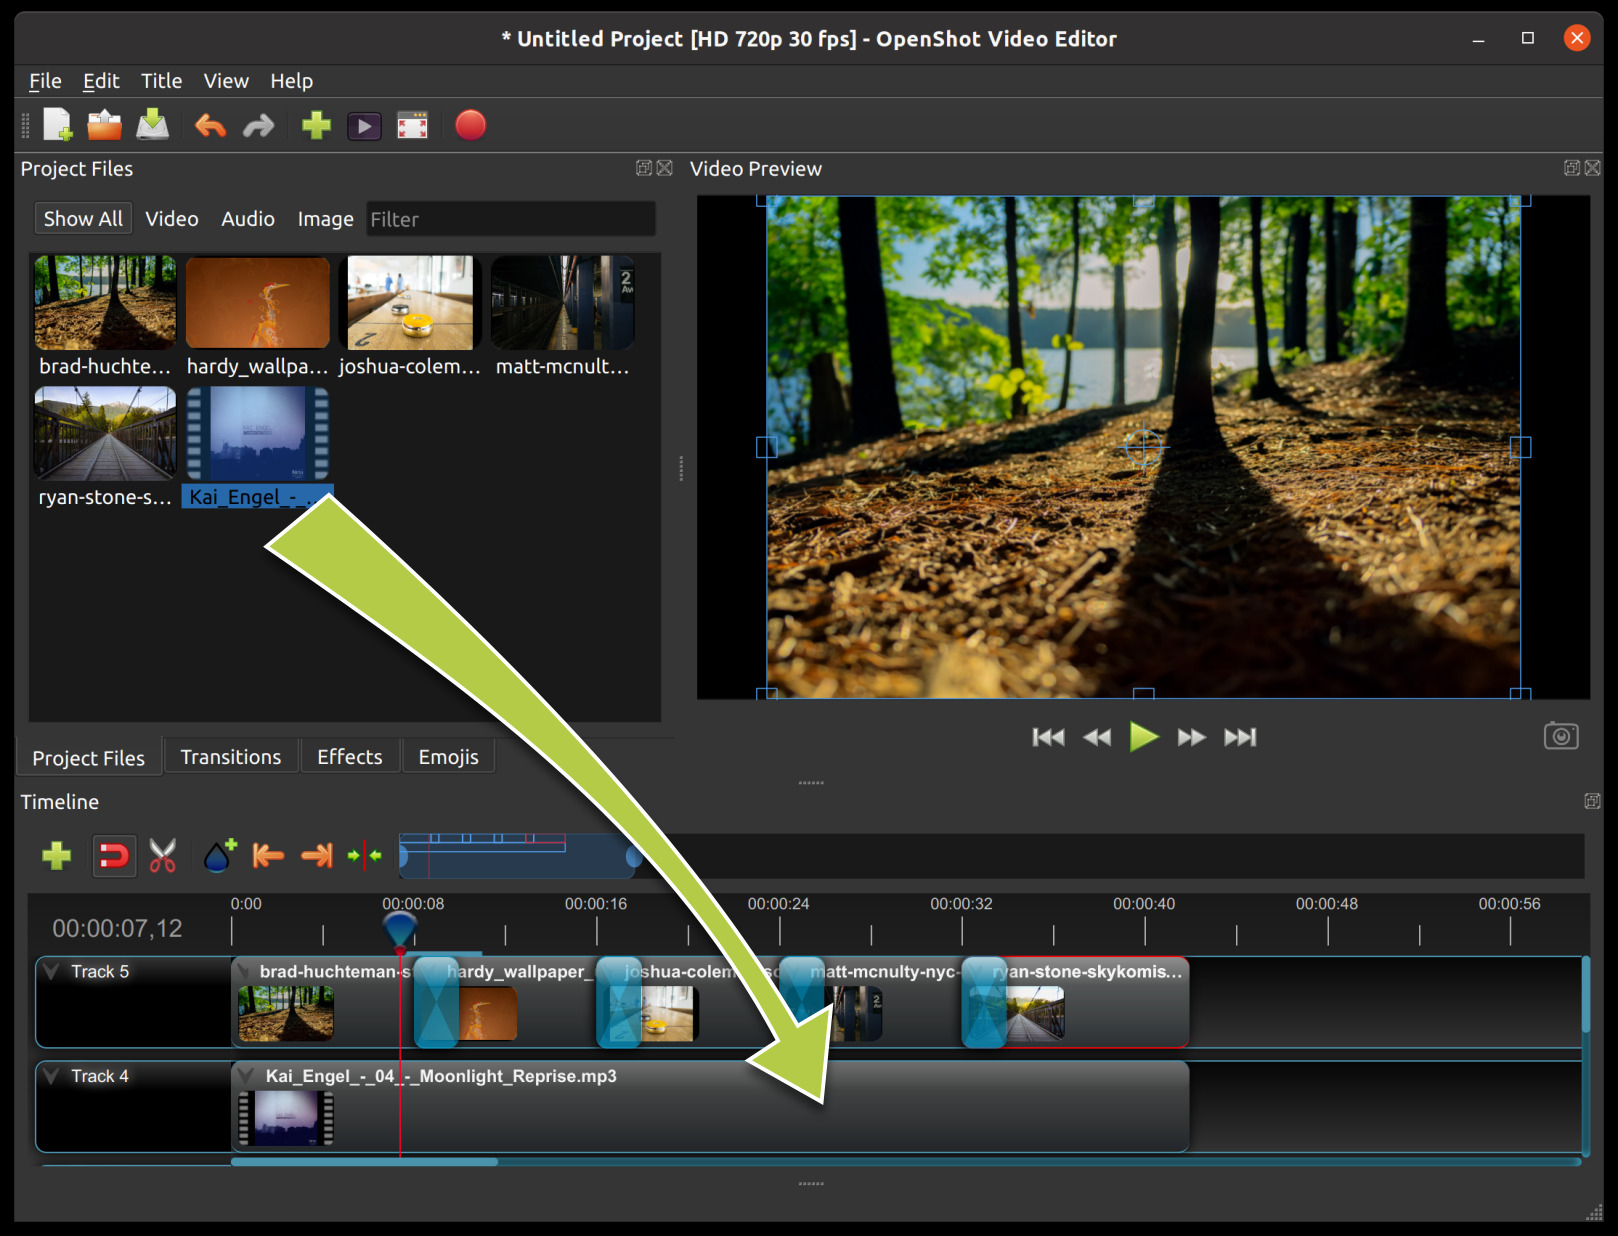
Step 3 – Add Music to Timeline
To make our creation more interesting, we need to add some music. Click on the music file that you imported in step 1, and drag it onto the timeline. If the song is too long, grab the right edge of your music clip, and resize it smaller (that will make it end earlier). You could also insert the same file multiple times if your music is too short.
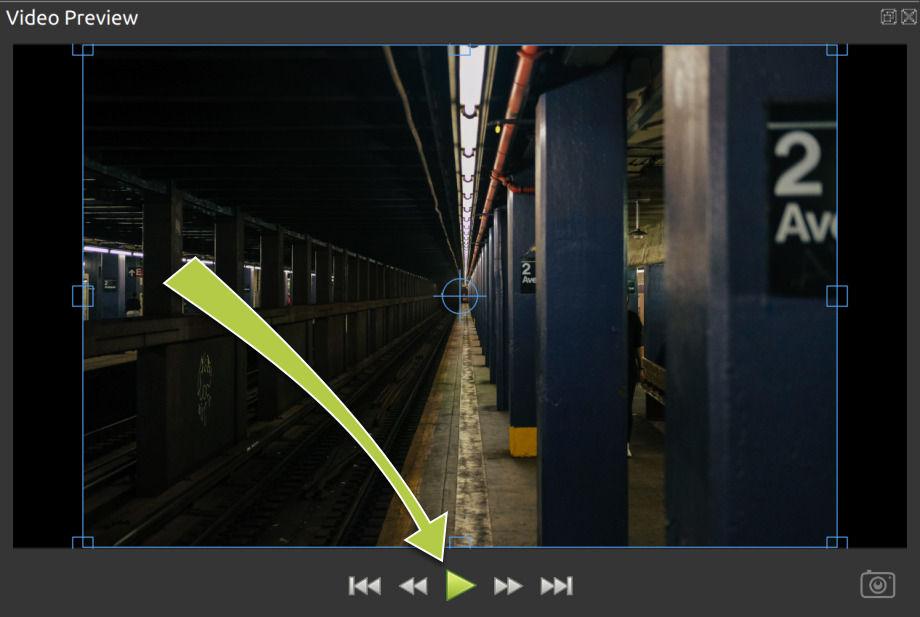
Step 4 – Preview your Project
To preview what our video looks & sounds like, click the Play button under the preview window. You can also pause, rewind, and fast-forward your video project by clicking the corresponding buttons.
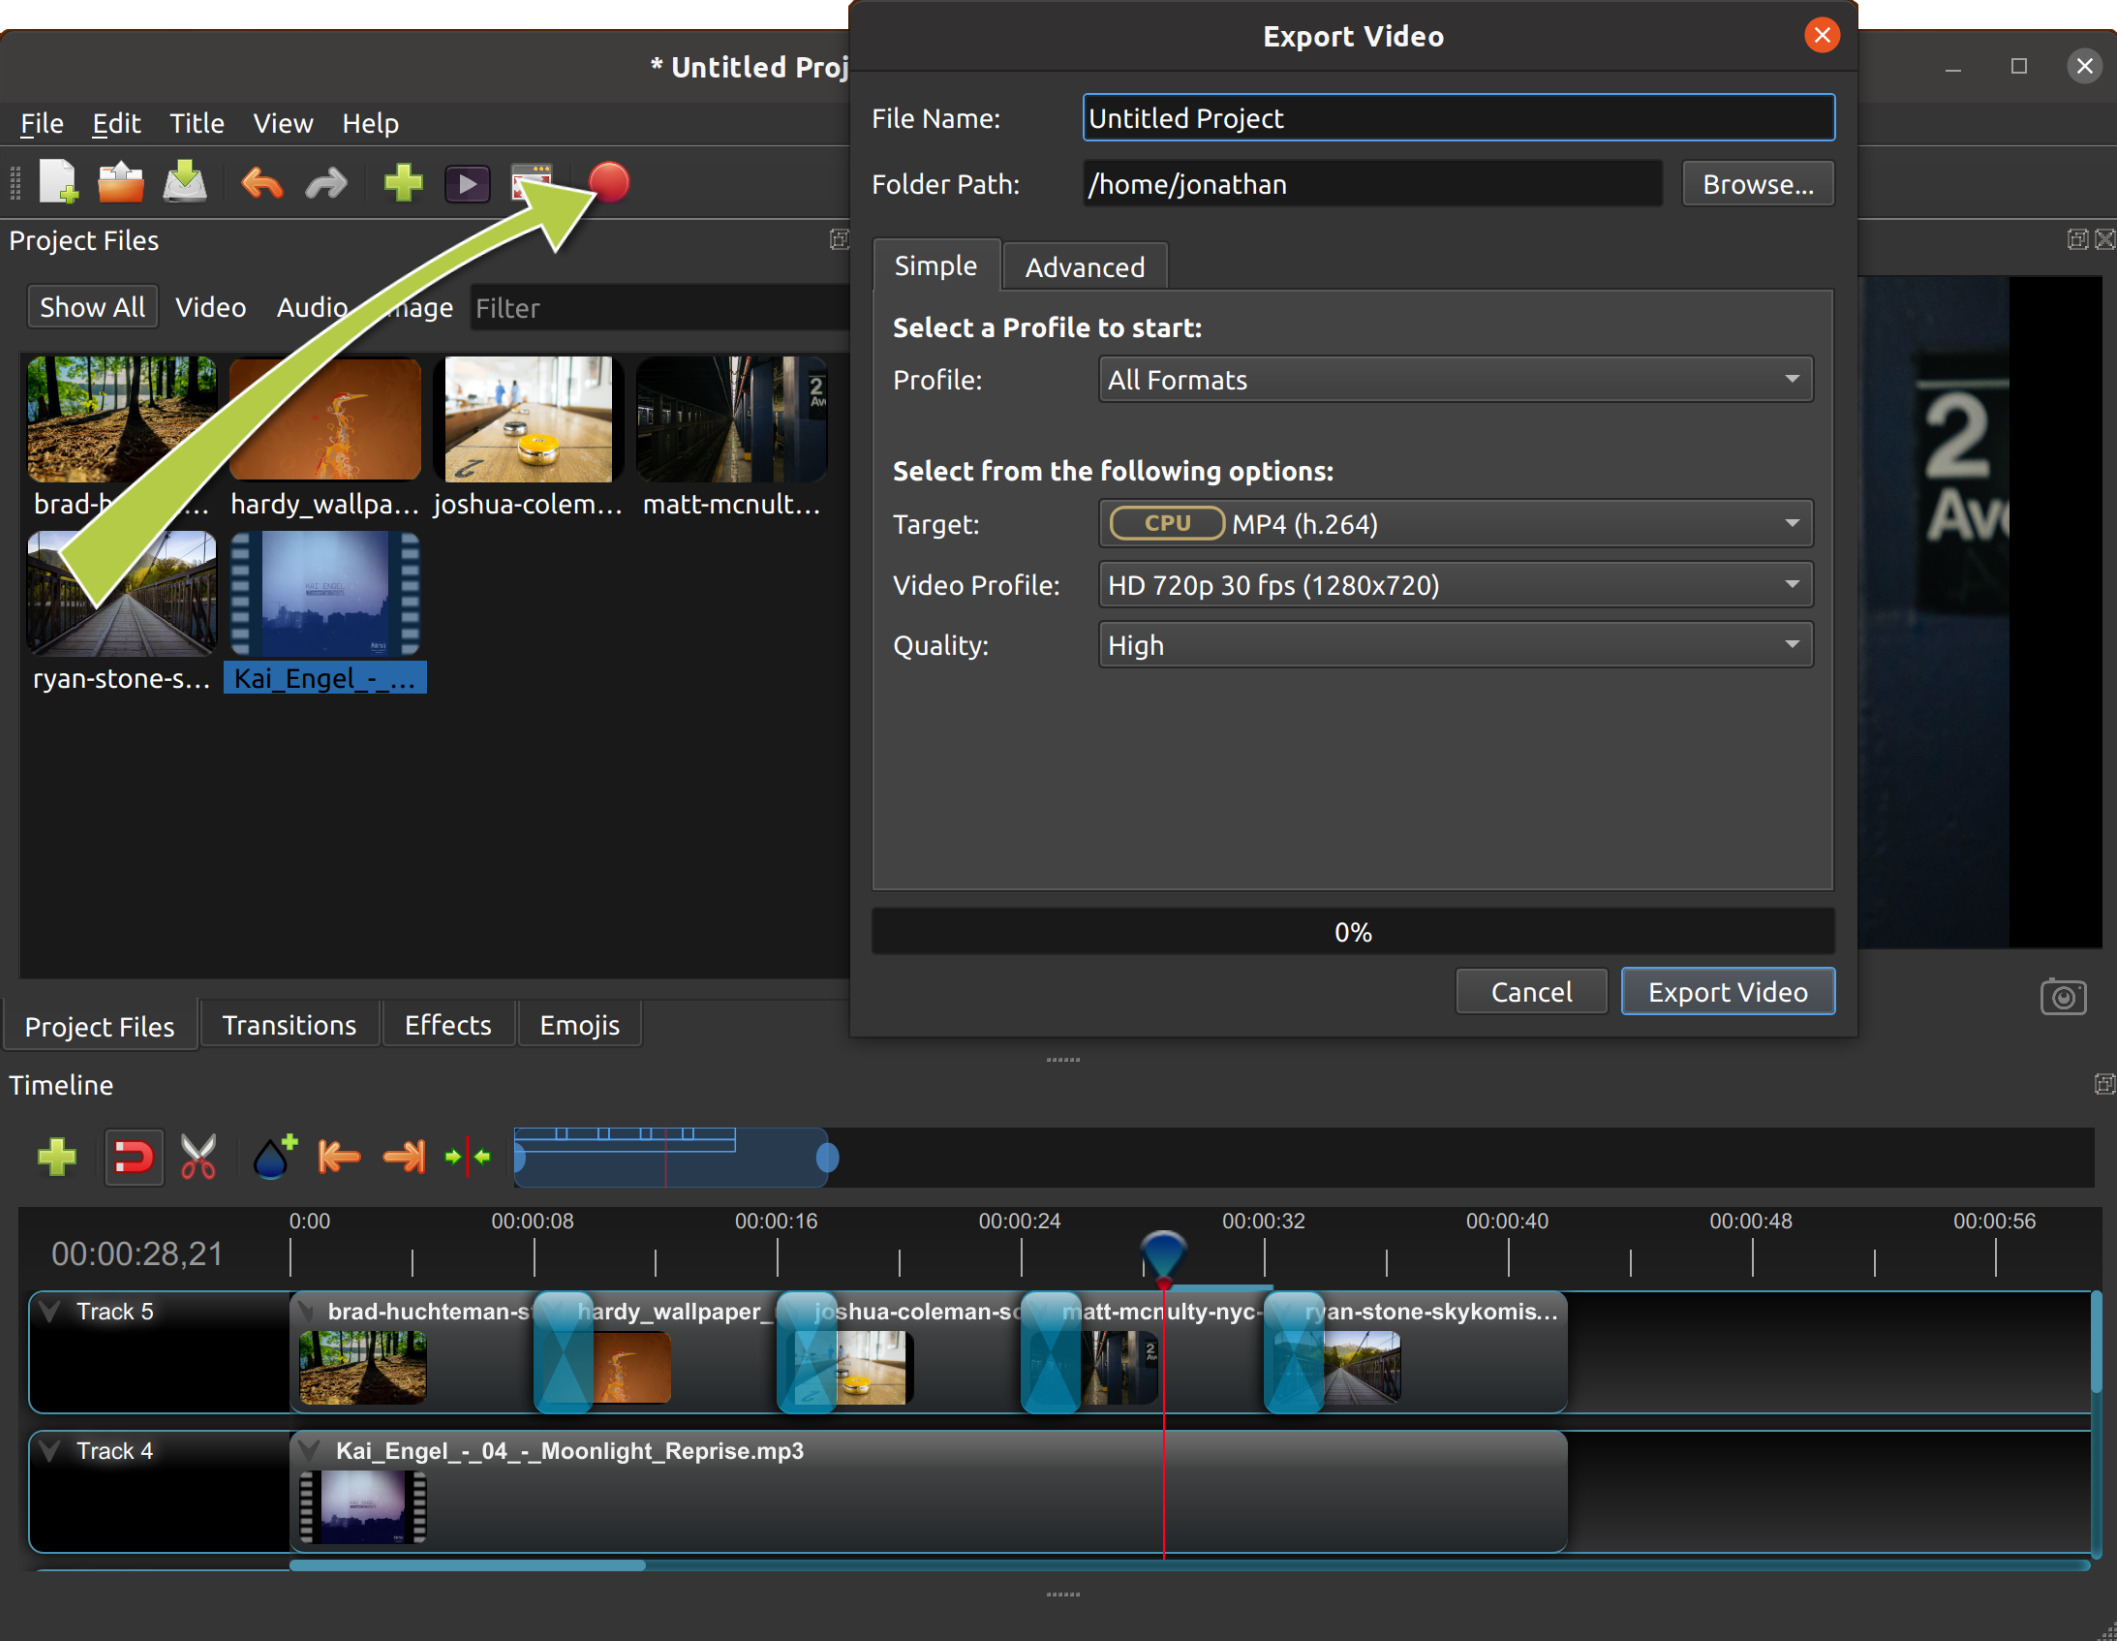
Step 5 – Export your Video
Once you are happy with your project, the next step is to export your video. This will convert your OpenShot project into a single video file, which will work on most media players (such as VLC) or websites (such as YouTube, Vimeo, etc…).
Click on the Export Video icon at the top of the screen (or use the File > Export Video menu). Choose from one of the many preset export options, and click the Export Video button.
 You should now have a basic understanding of how OpenShot works. Importing, Arranging, Previewing, and Exporting. Hopefully, this tutorial took less than 5 minutes for you to complete. Please read the rest of this guide for a more detailed understanding of OpenShot, and it’s advanced features. Enjoy!
Openshot En Linux Mint, Openshot For Linux, Openshot For Linux Mint, Openshot Linux Install, Openshot Linux Repository, Openshot Linux Ubuntu, Openshot On Linux
New tool called Web App Manager for Linux Mint
In its monthly update, the Linux Mint project announced that it’s working on a new app called Web App Manager that’ll let users turn their favorite websites into stand-alone applications that can be found in the start menu and be pinned to the taskbar. The Mint team is developing the tool in collaboration with the Peppermint OS team which has built a similar tool before.
As things stand right now, the Peppermint team has a tool called ICE that lets you turn websites into web apps. In a thread on GitHub, the head of Linux Mint, Clem Lefebvre suggests that the ICE back-end be separated from the interface so that the Mint team and Peppermint team can use their own respective interface. This plan isn’t definite yet but has been suggested.
Gallery: Web App Manager

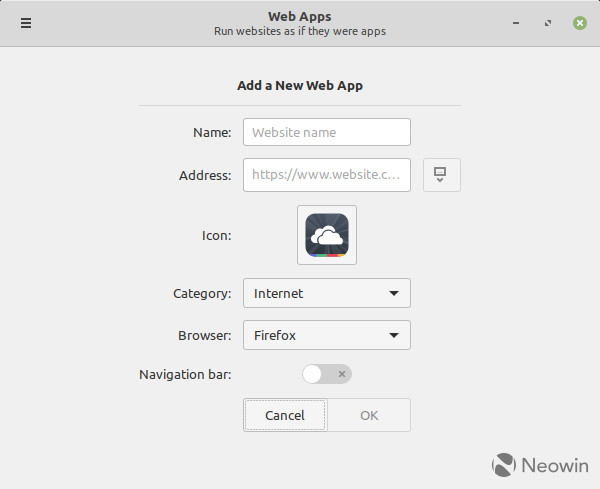
According to the images that have been made available, users will be presented with a list of web apps that they have already created. Users can remove and edit these or add a new web app. When creating a new web app, users will need to supply the app’s name, web address, an icon, which category it should be included in on the menu, which browser it should open in, and there’s a toggle to hide the browser’s navigation bar.
Another nice aspect of these web apps is that they’ve created with their own browser profile and appear in their own window. Not only does this give users help to separate their general browsing from their web app browsing but it also makes switching between apps on the Alt-tab selector a bit easier.
The Web App Manager is currently available for download but keep in mind that it is beta quality and isn’t fully translated. Around November or December when Linux Mint 20.1 launches, the new Web App Manager will probably be included.

Microsoft Edge for Linux is Here First Look
BY ARINDAM – UPDATED ON
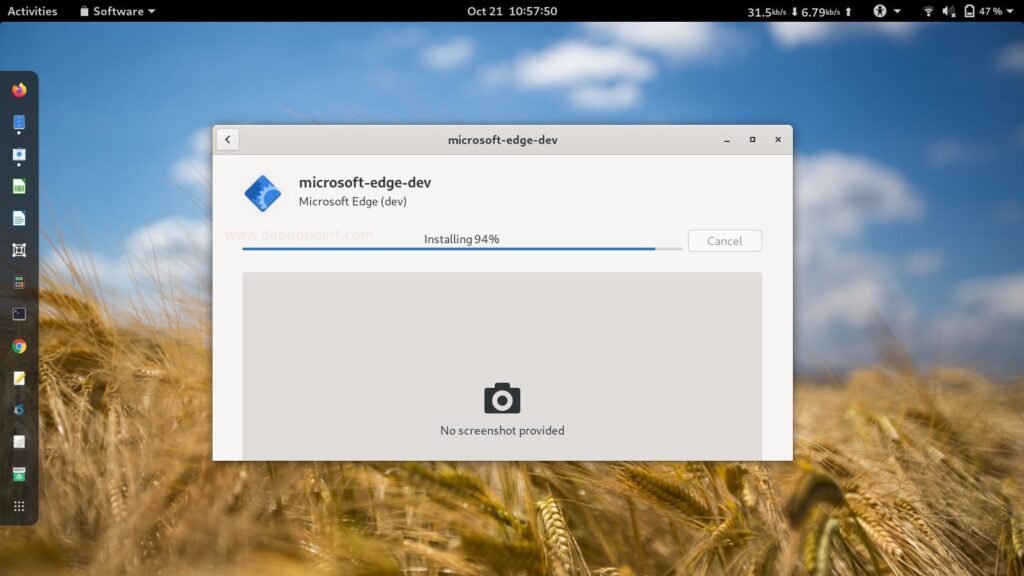
Microsoft announced the Edge for Linux today as a developer preview and it is immediately available for download as .deb and .rpm builds. And Edge for Linux looks great and the browsing experience feels super fast.
After the not-so-good success of the earlier Edge browser, Microsoft decided to dump Edge code and fork the open-source Chromium browser to re-develop the default browser for Windows. And after a while, they announced that a build for Linux is coming in October 2020.
This is dev channel preview builds available for Ubuntu/Debian based systems and Fedora as well. Remember that, it might contain bugs and you can try it to experience how it feels.
Try not to use Edge now for serious work, like banking transactions, etc as it is still dev build and might cause issues.

Download Link and Install guide
The .deb and .rpm package is present in the below link. It’s around 84MB in size. Once downloaded, install it using Software in Ubuntu or use gdebi / dnf to install.
The version is in the above link is Edge (Dev) 88.0.673.0.
For detailed instruction and guide for install in Ubuntu, Fedora, and openSUSE visit the page below.
Edge in Linux – First Look
Microsoft Edge Chromium Linux, Microsoft Edge For Linux Download, Microsoft Edge Linux Release, Microsoft Edge On Linux Mint, Microsoft Edge To Linux

Essential Applications for Desktop Linux Users
Brief: What are the must-have applications for Linux? The answer is subjective and it depends on what purposes you have for using desktop Linux. But there are still some essential Linux apps that are more likely to be used by most Linux users. Here we’ve listed the best Linux applications that you should have installed on every Linux distribution you use.
In the world of Linux, there are alternatives to everything. Choosing a distro? There are dozens of them. Trying to find a decent music player? Lots of alternatives there too.
But not all of them are built with the same thing in mind – some of them might target minimalism while others might offer tons of features. Finding the right application for your needs can be quite a confusing and tiresome task. Let’s make it a bit easier.
Essential applications for Linux users
I’ve put together a list of the essential Linux applications I prefer to use in different categories. I’m not saying that they are the best, but I’ve tried lots of applications in each category and these are the ones I liked the most. So you’re more than welcome to mention your favorite applications in the comments section too.
We’ve also compiled a nice video of this list. To subscribe to our YouTube channel for more educational Linux videos like this one:

We’ll mention some non-FOSS apps here as well (for the sake of regular users who just want a working desktop) – so feel free to let us know your non-FOSS suggestions after reading our recommendations.
In addition, we’ve categorized the apps as well to get you started!
Image Editors
We’ve already discussed some of the best photo applications for Linux. Here we’ll mention two essential tools for almost every type of user.
GIMP
Allowing plugins that extend its functionality while being an open-source solution is impressive. It offers almost every type of tool you will ever require to manipulate an image, scale it, crop it, or simply add a layer to it. You can install it from your AppCenter or Software Center, or visit GIMP’s website to download it.
Inkscape
One of the best Linux tools for digital artists, Inkscape is certainly an impressive image editor as well. Unlike GIMP, Inkscape comes pre-installed on most of the major Linux distros. It offers a bunch of drawing tools and vector graphics editing capabilities making it a powerful choice for manipulating images as well.
Audio Editors

Audacity
We’ve mentioned several audio editors in the past, but Audacity is the most popular tool for basic editing tasks. You can try to experiment and maybe pull off something interesting as well. It supports plugins to extend its functionality. If you’re wondering, it’s open source software and available for free. You can install it directly from the App Center or Software Center, or from the official download page.
LMMS
LMMS is a free Digital Audio Workstation (DAW) for Linux. It’s a feature-rich alternative to premium audio editors (or DAWs) for creating, editing, and recording music. If you have a MIDI device, you can just plug it into your machine and get started with LMMS. It also supports VST plugins to enhance your output. You can directly download it from the App Center or the Software Center. To build from source, check out their GitHub page.
Email Clients

Hiri
Even though Hiri isn’t an open-source client, it’s still one of the best available for people using Microsoft Exchange. Unfortunately, there’s no free version – but you can opt for a 7-day trial and decide for yourself if you want to use it or not. Personally, looking at the features and the UI offered, I think it’s worth it.
What are your thoughts on it?
Thunderbird
A simple and free email client developed by Mozilla. You may find it pre-installed on some Linux distributions – if not, you can easily install it using your Software Center or App Center. You can also download it from their website and then install it.
It offers most of the features you need – however, the UI may be the only downside for some.
Screen Recording and Streaming Tools

Blogger, YouTuber, or work in similar industries? Here are a few tools for you.
Kazam
If you’ve been following us, you might have already read about the best screen recorders available for Linux. Kazam is the most simple solution among them. It lets you record your screen and includes a number of essential features like giving you the ability to select the area/window, hiding/showing the cursor and enabling the sound from your mic/speaker. For installation instructions, their GitHub page would be your best bet.
OBS
Open Broadcaster Software is a pretty popular and robust screen recorder app often used by streamers.
You can heavily customize it, add your own template, etc. So there’s a lot of things you can do once you start exploring it. OBS is suitable for both personal and professional users – it’s not the easiest but it’s really useful.
Flameshot
Flameshot is my personal favorite for taking screenshots and annotating them. Heck, you can even directly upload your images to Imgur without needing to save them on your PC. Refer to the GitHub page for installation instructions. I use this no matter what Linux distro I install — it’s so easy and flexible, you might want to install it too.
Ksnip
A quite simple Qt-based cross-platform screenshot tool that offers more annotation features. We’ve discussed multiple ways to take screenshots in Linux, and using Ksnip is one of them. It’s fairly new, and not the most popular screenshot tool out there, but it works as expected. Refer to the GitHub page for more info.
Applications For Linux, Applications For Linux Mint, Art Applications For Linux, Cool Applications For Linux, Essential Applications For Linux, Top Applications For Linux

Things To Do After Installing Linux Mint 20
Linux Mint is easily one of the best Linux distributions out there and especially considering the features of Linux Mint 20, I’m sure you will agree with that.
In case you missed our coverage, Linux Mint 20 is finally available to download.
Of course, if you’ve been using Linux Mint for a while, you probably know what’s best for you. But, for new users, there are a few things that you need to do after installing Linux Mint 20 to make your experience better than ever.
Recommended things to do after installing Linux Mint 20
In this article, I’m going to list some of them for to help you improve your Linux Mint 20 experience.
1. Perform a System Update

The first thing you should check right after installation is — system updates using the update manager as shown in the image above.
Why? Because you need to build the local cache of available software. It is also a good idea to update all the software updates.
If you prefer to use the terminal, simply type the following command to perform a system update:
sudo apt update && sudo apt upgrade -y2. Use Timeshift to Create System Snapshots

It’s always useful have system snapshots if you want to quickly restore your system state after an accidental change or maybe after a bad update.
Hence, it’s super important to configure and create system snapshots using Timeshift if you want the ability to have a backup of your system state from time to time.
You can follow our detailed guide on using Timeshift, if you didn’t know already.
3. Install Codecs
To make sure that you don’t have issues with playing a MP4 video file or any other file formats of media, you might want to install the media codecs to make sure that most of the media file formats work on your system.
You can just search for “mint-meta-codecs” on your software center or simply type in the following command in the terminal to install it:
sudo apt install mint-meta-codecs4. Install Useful Software
Even though you have a bunch of useful pre-installed applications on Linux Mint 20, you probably need to install some essential apps that do not come baked in.
You can simply utilize the software manager or the synaptic package manager to find and install software that you need.
For starters, you can follow our list of essential Linux apps if you want to explore a variety of tools.
Here’s a list of my favorite software that I’d want you to try:
- VLC media player for video
- FreeFileSync to sync files
- Flameshot for screenshots
- Stacer to optimize and monitor system
- ActivityWatch to track your screen time and stay productive
5. Customize the Themes and Icons

Of course, this isn’t something technically essential unless you want to change the look and feel of Linux Mint 20.
But, it’s very easy to change the theme and icons in Linux Mint 20 without installing anything extra.
You get the option to customize the look in the welcome screen itself. In either case, you just need to head on to “Themes” and start customizing.
Linux Mint 20, Linux Mint 20 After Install, Linux Mint 20 Cinnamon, Linux Mint 20 Enable Snap
Snapshots Of System, System Snapshots Linux Mint, Ubuntu System Snapshots
Install Codecs Linux Mint, Install Media Codecs In Linux
Flatpak Extensions, Flatpak Linux, Flatpak On Ubuntu, Flatpak Ubuntu, Flatpak Ubuntu 20.04
Linux Mint 20 Beta is Ready
Linux Mint announced the immediate BETA release of its upcoming version Linux Mint 20 “Ulyana”.
Scheduled for the end of June 2020, Linux Mint 20 promises plenty of new features in its primary three flavors XFCE, Cinnamon, and MATE.
This beta release is the pre-final version to iron out last-minute bugs and is available for download immediately.
Before you hit download, here are the upcoming changes in the Linux Mint 20 which you should check out now before your final experience with Linux Mint 20.

What’s New in Linux Mint 20
Linux Mint 20 is dropping support for 32-bit images officially and only to be available as a 64-bit image. That means the older computers will not be able to run the latest Linux Mint. But if you are having an older system setup running Linux 18.x, 19.x – they will continue to run but will not be getting security and other updates when support ends.
It is based on the current Ubuntu 20.04 LTS release and available with three desktop environment variants – Cinnamon, XFCE and MATE.
Linux Mint, Linux Mint Cinnamon, Linux Mint Editions, Linux Mint Mate, Linux Mint Releases, Linux Mint Upgrade

HandBrake 1.3.3 Open-Source Video Converter
Open-source and cross-platform HandBrake 1.3.3 video converter have been released today with several improvements and bug fixes.
This release improves support for MKV files by fixing an issue that made ISO 639-2/B language codes not to be set correctly, which affected Hebrew, Indonesian, Japanese, and Yiddish languages, and improves Intel QSV memory footprint and H.265 memory buffer size as needed by newer Intel Media SDK.
HandBrake 1.3.3 also adds better support for SSA (SubStation Alpha) subtitles by fixing a handling issue of overlapping imported SSA subtitles and improving support for out-of-order SSA subtitles. Also improved is Flatpak support, especially the building efficiency of the Intel QSV Flatpak plugin.
This release comes with support for the latest FFmpeg 4.2.3 open-source and cross-platform multimedia framework, which is needed for decoding and filters, as well as a new patch for improving the cross-compilation of the libdav1d AV1 decoding library included in FFmpeg 4.2 using GCC 10.x or later.
Among other noteworthy changes, HandBrake 1.3.3 improves support for video sources where the pixel format can’t be identified in a timely way, implements logging to identify where hardware support is disabled, and fixes an issue where full-range video files were identified as limited range after conversion when using filters.
Linux Video Converter Mkv To Mp4, Linux Video Converter Ubuntu
Flatpak Linux, Flatpak On Ubuntu

Build Debian Packages From Source
Debian and Debian-based systems like Ubuntu uses Advanced Package Tool, or APT in short, for installing, updating, upgrading and removing software from command line. Usually, the APT package manager stores the list of repositories in the file named /etc/apt/sources.list and in any file with the suffix .list under the directory /etc/apt/sources.list.d/. When we install a package, apt command retrieves the binary or pre-compiled version of the given package from these repositories. In addition to installing binary packages, APT can also lets you to download the source code of a package. So you can then add some features in the source, build the package from the source code, and finally install the modified version of the package. This guide explains how to build debian packages from source on Debian, Ubuntu and other APT-based systems like Linux Mint.
Why should we build a package from source?
There could be many reasons to build a package from source. Here are a few reasons I could think of now:
- Inspect the source code to find a bug.
- Add new features in the packages that aren’t being actively developed any longer.
- Install the most recent version of a package from source. Generally, the packages in the official repositories might be bit old.
- And more importantly – learn to build Debian packages from source.
Build Debian Package From Source Tarball, Build Debian Package From Tarball, Build Debian Packages, Build-essential Package Debian Install, Debian Build Package Install, How To Build Debian Packages, Ubuntu Build Debian Source Package
BleachBit 4.0 System Cleaner
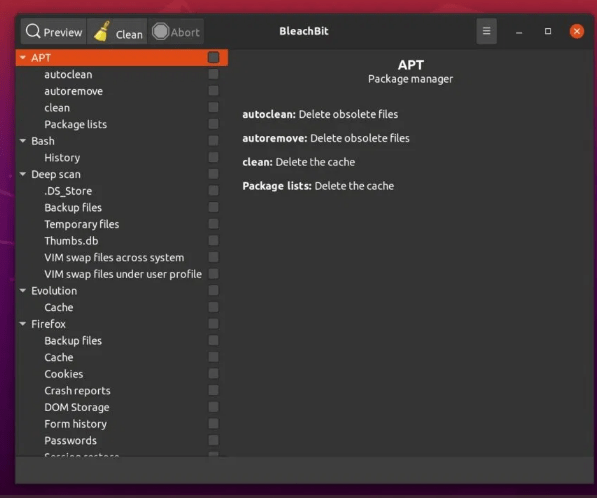
BleachBit, the open-source disk space cleaner, privacy manager, and computer system optimizer software has reached a major milestone, version 4.0, which brings many improvements and major changes.
One of the major changes of BleachBit 4.0 is support for Python 3 to ensure the application will work well on the latest releases of the popular Ubuntu Linux distribution, such as Ubuntu 19.10 or the upcoming Ubuntu 20.04 LTS, which dropped support for Python 2.
This release also brings dedicated packages for the Fedora Linux and openSUSE Tumbleweed distributions, making it easier to install the software on these popular GNU/Linux distributions. For Fedora Linux, is also enables cleaning of DNF autoremove.
Furthermore, BleachBit 4.0 enables cleaning of the VLC Media Player on older GNU/Linux distributions and implements support for reporting the cleaned space after cleaning APT autoremove, as well as pop-up notifications when cleaning is done.
Support for cleaning Discord files was added as well in this major release, which now cleans even more files for Mozilla Firefox (cookies and history), Google Chrome (IndexDB), and Opera web browsers, as well as the gPodder open-source media aggregator and podcast client.
Of course, the usual improvements are present as well to improve the responsiveness of the application window when cleaning files, allow cleaning of custom folders when overwrite open is enabled, and make the copy button work again in the diagnostics window.
Bleachbit 4.0, Bleachbit Cleaner, Bleachbit Linux, Bleachbit Open Source, Bleachbit Tarball, Bleachbit Ubuntu

How to Install Zoom in Linux
This article was written for Debian based distro’s. Sorry, you RPM fans.
With the World Wide lockdown, and the new term, Social Distancing, everyone is finding new ways to stay connected. Services like Duo, Skype, Go To Meeting, and Zoom. Zoom seems to be the online meeting of choice. Zoom also has an app for all the operating systems. Linux included.
So here is how to install Zoom on your Linux system.
Go to https://zoom.us/support/download and from the drop-down box, select your Linux distro, and download the file.
Move the downloaded file to the root of your home directory. Make sure you don’t have any other ( *.deb ) file in the directory. You don’t want to re-install them again.
Once your zoom file is in your home directory, open a terminal window and type the following command.
sudo dpkg -i *.deb (-i is a small I )
This command will install any DEB file, and you don’t have to know the name either.
You more then likely get errors, (You guys know that’s why I like the terminal window, I can see if there are problems installing programs)
So to fix any errors, type the command in the terminal window.
sudo apt-get install -f
Follow the prompts and pay attention if any of the yes’s are in caps. Exp: (Y/n)
If you see the Y in caps, make sure you reply with a capital Y.
Once it finishes, you’re done. You should now have the Zoom app in the Menu under the Internet.
Hope this helps you.