Posts by Bob L

Linux Distros for Old Laptop 2019
Do not discard that old PC or laptop yet. You can use a lightweight Linux distro to make them as good as new. Some of these Linux distros are specifically for use in older machines.
You can use any of the lightweight Linux distros and bring your old machine back to life. In as much we focus on the old distros, we do have some new releases that do not require many resources that can re-invent your old computers.
Are you in any or all of the situations below?
Your computer is but still feel like you can revive it
Your computer is modern but runs on low power
You need to install a modern computer to reserve resources to other demanding tasks
If you find yourself in any of the above situations, then the best choice of action would be to start looking for the best lightweight Linux distros for old computers.
1. Lubuntu

Minimum System Requirements
Pentium II or Celeron CPU with Physical Address Execution (PAE)
128 MB of Ram
2 GB of hard drive
As the name suggests, Lubuntu is a member of the popular Ubuntu family. It runs on the LXDE desktop environment and as such it one of the official flavors of Ubuntu. Lubuntu works well with old computers, and its lightness is visible in its speed and support for older hardware.
It has a set of applications and software with tools like office, internet, graphics applications, and related utilities. The applications running within Lubuntu utilize fewer resources, and they have better alternatives if need be.
You can access thousands of additional packages via the Ubuntu software repository. When the Operating System is merged with Razor-qt to develop LXQt.
2. Linux Lite

Minimum System Requirements
700 MHz Processor speed
512 MB of RAM
Resolution of 1024 X 768
5 GB of hard disk space
From its name “lite,” it means there is no need for high-end hardware requirements. Even a beginner will find a lot of comforts using it for the first time. Linux Lite runs on Ubuntu Long Term Support (LTS) with a support life of up five years.
Lightweight Linux Distro For Old Laptop, Linux Distro For An Old Laptop, Small Linux Distro For Old Laptop, The Best Linux Distro For Old Laptop, The Fastest Linux Distro For Old Laptop, Top Linux Distros For Old Laptops

Chmod Command in Linux File Permissions
In Linux, access to the files is managed through the file permissions, attributes, and ownership. This ensures that only authorized users and processes can access files and directories.
This tutorial covers how to use the chmod command to change the access permissions of files and directories.
Linux File Permissions
Before going further, let’s explain the basic Linux permissions model.
In Linux, each file is associated with an owner and a group and assigned with permission access rights for three different classes of users:
- The file owner.
- The group members.
- Others (everybody else).
File ownership can be changed using the chown and chgrp commands.
There are three file permissions types that apply to each class:
- The read permission.
- The write permission.
- The execute permission.
This concept allows you to specify which users are allowed to read the file, write to the file, or execute the file.
File permissions can be viewed using the ls command:
ls -l filename.txt-rw-r--r-- 12 linuxize users 12.0K Apr 8 20:51 filename.txt
|[-][-][-]- [------] [---]
| | | | | | |
| | | | | | +-----------> 7. Group
| | | | | +-------------------> 6. Owner
| | | | +--------------------------> 5. Alternate Access Method
| | | +----------------------------> 4. Others Permissions
| | +-------------------------------> 3. Group Permissions
| +----------------------------------> 2. Owner Permissions
+------------------------------------> 1. File TypeThe first character shows the file type. It can be a regular file (-), directory (d), a symbolic link (l), or any other special type of file.
The next nine characters represent the file permissions, three triplets of three characters each. The first triplet shows the owner permissions, the second one group permissions, and the last triplet shows everybody else permissions. The permissions can have a different meaning depending on the file type.
In the example above (rw-r--r--) means that the file owner has read and write permissions (rw-), the group and others have only read permissions (r--).
Each of the three permission triplets can be constructed of the following characters and have a different effects, depending on whether they are set to a file or to a directory:
Effect of Permissions on Files
Effect of Permissions on Directories (Folders)
In Linux, Directories are special types of files that contain other files and directories.
Using chmod
The general form of the chmod command take the following form:
Linux File Permissions, Linux File Permissions All Users, Linux File Permissions Command, Linux File Permissions Examples
Chmod Codes, Chmod In Linux

Enable DNS-over-HTTPS (DoH) in Firefox
A step by step guide to enable DNS-over-HTTPS (DoH) support in the Firefox browser.
The DNS-over-HTTPS (DoH) protocol is currently the talk of the town, and the Firefox browser is the only one to support it.
However, the feature is not enabled by default for Firefox users, who will have to go through many hoops and modify multiple settings before they can get the DoH up and running.
But before we go into a step-by-step tutorial on how someone can enable DoH support in Firefox, let’s describe what it does first.
How DNS-over-HTTPS works
The DNS-over-HTTPS protocol works by taking a domain name that a user has typed in their browser and sending a query to a DNS server to learn the numerical IP address of the web server that hosts that specific site.
This is how normal DNS works, too. However, DoH takes the DNS query and sends it to a DoH-compatible DNS server (resolver) via an encrypted HTTPS connection on port 443, rather than plaintext on port 53.
This way, DoH hides DNS queries inside regular HTTPS traffic, so third-party observers won’t be able to sniff traffic and tell what DNS queries users have run and infer what websites they are about to access.
Further, a secondary feature of DNS-over-HTTPS is that the protocol works at the app level. Apps can come with internally hardcoded lists of DoH-compatible DNS resolvers where they can send DoH queries.
This mode of operation bypasses the default DNS settings that exist at the OS level, which, in most cases are the ones set by local internet service providers (ISPs).
This also means that apps that support DoH can effectively bypass local ISPs traffic filters and access content that may be blocked by a local telco or local government — and a reason why DoH is currently hailed as a boon for users’ privacy and security.
This is one of the reasons that DoH has gained quite the popularity in less than two years after it launched, and a reason why a group of UK ISPs nominated Mozilla for the award of 2019 Internet Vilain for its plans to support the DoH protocol, which they said would thwart their efforts in filtering bad traffic.
As a response, and due to the complex situation in the UK where the government blocks access to copyright-infringing content, and where ISPs voluntarily block access to child abuse website, Mozilla has decided not to enable this feature by default for British users.
The below step-by-step guide will show Firefox users in the UK and Firefox users all over the world how to enable the feature right now, and not wait until Mozilla enables it later down the road — if it will ever do. There are two methods of enabling DoH support in Firefox.
Method 1 – via the Firefox settings
Step 1: Go to the Firefox menu, choose Tools, and then Preferences. Optionally type about:preferences in the URL bar and press enter. This will open the Firefox prerences section.
Step 2: In the General section, scroll down to the Network Settings panel, and press the Settings button.

Dns Over Https, Dns Over Https Enable, Dns Over Https Ubuntu

Automate your Linux system tasks with cron
It might surprise the saltiest of system administrators to know that there is no Linux cron command. The cron daemon (crond) is a system-managed executable that runs in memory with which users may schedule tasks. The user command to work with the cron service is crontab (cron table). The crontab file is a simple text file that instructs the cron daemon to perform a task at a certain time or interval. Any user may schedule cron tasks or jobs on a system. The task runs under the user account from which it was created. In other words, if you create a cron task, it runs with your user account’s permissions. The same is true for any user on the system, including the root user.
Using cron
You can issue the man crontab command to see all possible options, but there are generally two that work for most users: -l (list) and -e (edit).
To see a list of your configured cron tasks, use:
$ crontab -l
no crontab for khess
I have no cron tasks running yet. To create one, I need to edit my crontab file:
$ crontab -eNote: There is no file name or designation of any kind required when creating a crontab entry. Each user has only one crontab file and you add all tasks to it.
There is nothing particularly special about the crontab editor except that, if you don’t have a specific editor defined with either the VISUAL or the EDITOR environment variable, then your editor is probably either vi or vim.
Note: If you don’t know how to use vi or vim, please refer to my article, An introduction to the vi editor.
Press the I key to enter INSERT mode and begin setting up your crontab entry. The crontab file has a specific syntax to it. See the image below:

Making it work
As you can see from the image, the positioning of your entries has meaning, and the entries are separated by spaces. An asterisk (*) means every or all, as in every minute or all hours, every day, and so on. In other words, the image currently illustrates a crontab entry for a script that will run every minute of every day. This practice, while rare, does exist in some instances. However, for most cron tasks, you will need to be more specific.
Note: Before setting up a cron task, run your script or command to see if you have any problems with permissions or paths.
It’s a good practice to provide the full path to any executable inside a script. Likewise, you should also provide the full path to executables or scripts in your crontab entries.
For example, if you have a script that needs to create a file from the dmesg command once a day at 1pm, your entry looks like the following:
* 13 * * * /usr/bin/dmesg > ~/dmesg.txtAnd if you want to email this file to yourself, you can add an additional entry into your crontab:
2 13 * * * /usr/bin/mail khess@domain.com < ~/dmesg.txtSave the file by exiting it as you would exit vi or your default editor. There is nothing special you have to do to enable this edited crontab. The cron daemon checks for the existence of entries in the /var/spool/cron directory automatically. For example, my crontab is /var/spool/cron/khess and contains the two entries above.
The cron daemon runs as root so it can read the directory’s contents since only the root user has access to this directory. It would be a serious security violation for other users to access /var/spool/cron and read the crontab entries for other users on the system.
More examples
For the following examples, assume that you have a script, backup.sh, that you want to schedule on your system. You’ve placed all your system scripts in /etc/scripts, which is a directory that only root has access to.
To schedule the backup script to run every night at 2am, open the root user’s crontab:
$ sudo crontab -ethen enter the following:
* 2 * * * /etc/scripts/backup.shSave and exit the file.
Let’s try something a little more advanced. Schedule the backup script to run at 2am every Monday. Now, what does the crontab entry look like? Refer back to the crontab syntax image for hints:
* 2 * * 1 /etc/scripts/backup.shThe 1 in the fifth column instructs cron to run this script on Monday.
Rather than have your special backup script run every Monday, run it on the 15th of every month:
* 2 15 * * /etc/scripts/backup.shWhat if the backup script only backs up a single mission-critical directory? You want that directory’s contents backed up every 15 minutes. Here’s how that would look, which isn’t 100% intuitive:
*/15 * * * * /etc/scripts/backup.shThe traditional method of setting this every 15-minute schedule looks like the following:
0,15,30,45 * * * * /etc/scripts/backup.shAnd similarly, if you want to run the script only Monday through Friday, your entry changes to:
*/15 * * * 1,2,3,4,5 /etc/scripts/backup.shAs you can see, cron scheduling is easy once you understand the syntax. The only real stumbling blocks you might experience with cron are pathing, permissions, and timing. You have to think about how long a script requires to execute and produce output before scheduling another process that depends on it. Referring back to the dmesg script, you can see that you need to know how long the dmesg command requires to finish processing and writing to the dmesg.txt file before scheduling the next command, which is to email the dmesg.txt file to yourself.
Wrapping up
Typically, the way system administrators and other users automate processes on a Linux system is to create scripts that perform functions such as creating files, moving files, emailing information, performing backups, reporting on backups, etc. When you schedule those same scripts in cron, you’ve created true automation on your system. There are very few repetitive tasks that cannot be automated using cron and scripts. If you experience problems with automating tasks that require passwords or interactive sessions, use expect scripts to automate those. If you don’t know expect, watch Enable Sysadmin for future posts on the topic.
There are other ways to automate things in Linux in addition to cron. For example, the at command can be used to run a job at a specific time. You can also set tasks to run at specific times by using systemd, though the systemd timers system.
[Want to try out Red Hat Enterprise Linux? Download it now for free.]
Automating Tasks With Cron, Scheduling Tasks With Cron, Tasks In Cron
Cron With Ubuntu, Use Of Cron, Using Cron Linux, Using Cron Ubuntu, Using Cron.daily

Free Up Space on Ubuntu
Let’s say you need to free up some space on Ubuntu — how do you go about it?
Unlike Windows, with its built-in defrag and disk clean-up tools, Ubuntu doesn’t make it immediately obvious how you go about trying to free up space.
What do you do once you’ve emptied the trash, and deleted those .ISO downloads? How do you recover more space?
We’re going to show you 5 super simple (and in some cases blindingly obvious if easily forgotten) steps you can take to get back those GBs, materialise more MBs, and clean out the stale KBs.
Whenever you need more space — and heck, even if you don’t — here are 5 simple ways to free up disk space on Ubuntu.
1. Clean the APT Cache (And Do It Regularly)
It sounds so obvious, and yet chances are you haven’t done this.
By default Ubuntu keeps every update it downloads and installs in a cache on your disk, just in case you ever need it again.
This is useful if you regularly add and remove apps, find yourself needing to reconfigure/reinstall a specific package, or simply have a poor connection.
But the flip side is that the apt package cache can quickly swell to several hundred MBs. This command tells you how big your apt cache is:
du -sh /var/cache/apt/archives
To clean the apt cache on Ubuntu simply run the following command.
sudo apt-get clean
The apt clean command removes ALL packages kept in the apt cache, regardless of age or need. If you’re on a slow, capped or intermittent connection you may want to consider skipping this step.
2. Remove Old Kernels (If No Longer Required)

Now, admittedly, this step is one you want to approach with caution.
Having a choice of kernels to boot up is, honestly, quite handy, especially if you notice something has gone awry while using the latest one.
Unless you’re in the throes of constant hardware woes there’s little need to hoard kernels.
It’s easy to remove old kernels in Ubuntu. You can do it from the command line using the following command:
sudo apt-get autoremove --purge
Note that this command will only remove kernels that a) are no longer needed and b) were installed from the Ubuntu archive through system updates. If you install kernels manually or through a third-party PPA you’ll need to get your hands dirty.
3. Uninstall Apps & Games You Never Use (And Be Honest!)
Chances are you have a number of apps installed that you never use. Maybe you installed them on the back of an awesome review, out of nosiness, or to handle a particular task.
Whatever the excuse, if an app is no longer needed, but more space is, don’t be afraid to uninstall it.
Typical apps you may wish to expunge include web browsers (are you ever going to use Opera, Epiphany, Midori and Min?), music players (heck knows there’s enough of ’em) and games that sounded good in the Steam Store description but ended up being as much fun as a Windows 10 update combo.
And everyone has LibreOffce Draw knocking about doing nothing!
Don’t lie to yourself about might-needs, and could-dos. The beauty of most software is that it’s not going anywhere anytime soon. This is never truer than on Linux, where most apps are just an apt install command away.
To remove a specific app by name run:
sudo apt-get remove package-name1 package-name2
To remove packages and dependencies that are no longer required (because you’ve uninstalled other packages or newer versions have replaced them) run the following command:
sudo apt-get autoremove
4. Use A System Cleaner like BleachBit

Writing a list on system cleaning could easily end up 10x as long as this one if we were to tell you about every app, cache, log and system process hiding in every nook and cranny.
BleachBit saves us from doing that. It’s like the CCleaner of Linux – a byte scouring beast. The app can remove pretty much everything and anything and should only ever be used with caution.
It can wipe the caches of more than 70 popular desktop applications (including most web browsers); hoovers up old file, browser and bash history; and makes light work of logs you’ll never read.
No surprise that we recommend installing it as one of our things to do after installing Ubuntu.
You can install BleachBit on Ubuntu 16.04 LTS straight from Ubuntu Software. Run it as root, and check the boxes besides the parts you’d like to clean. Click ‘Preview’ to get an estimate of how much space they take up, and click “Clean” to remove them.
Free Up Disk Space In Ubuntu, Free Up Space In Ubuntu, Free Up Space On Ubuntu, How To Free Up Space On Ubuntu
Apt-get Autoremove Purge, Apt-get Autoremove Purge Kernel, Ubuntu Apt-get Autoremove Purge
Sudo Apt Get Autoremove Ubuntu, Sudo Apt-get Autoremove Linux-image, Sudo Apt-get Autoremove On Ubuntu
Super Grub2 Disk – boot into most any Operating System even if you cannot boot into it by normal means
Super Grub2 Disk
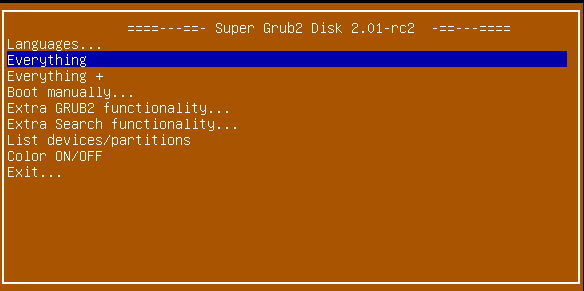
Super GRUB2 Disk helps you to boot into most any Operating System (OS) even if you cannot boot into it by normal means.
Tour
Here there is a little video tour in order to discover most of Super Grub2 Disk options. The rest of the options you will have to discover them by yourself.
Features
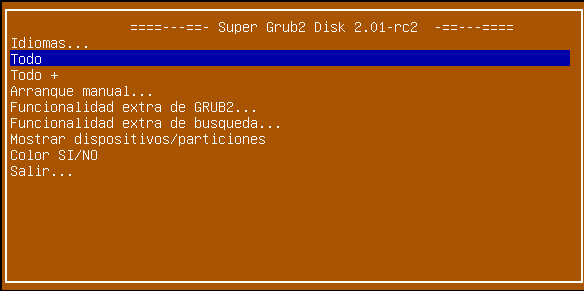
- Change the language UI
- Translated into several languages
- Spanish / Español
- German / Deutsch
- French / Français
- Italian / Italiano
- Malay / Bahasa Melayu
- Everything option to detect most Operating Systems
- Everything plus option to detect most Operating Systems also in special devices or filesystems
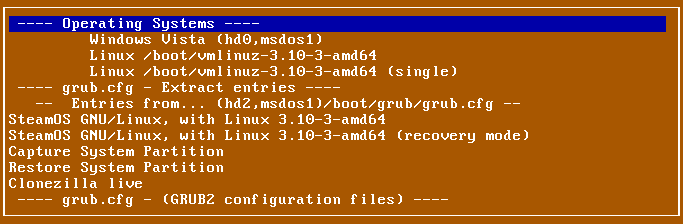
- Boot manually
- Operating Systems
- grub.cfg – Extract entries
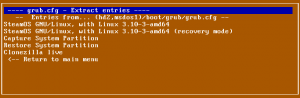
Super Grub2 Disk 2.01 beta 3 grub.cfg Extract entries option - grub.cfg – (GRUB2 configuration files)
- menu.lst – (GRUB legacy configuration files)
- core.img – (GRUB2 installation (even if mbr is overwritten))
- Bootable ISOs (in /boot-isos or /boot/boot-isos
- Extra GRUB2 functionality
- Enable GRUB2’s LVM support
- Enable GRUB2’s RAID support
- Enable GRUB2’s PATA support (to work around BIOS bugs/limitation)
- Mount encrypted volumes (LUKS and geli)
- Enable serial terminal
- Extra Search functionality
- Search in floppy ON/OFF
- Search in CDROM ON/OFF
- List Devices / Partitions
- Color ON /OFF
- Exit
- Halt the computer
- Reboot the computer

Supported Operating Systems
- Windows
- Windows Vista/7/8/8.1
- Windows NT/2000/XP
- Windows 98/ME
- MS-DOS
- FreeDOS
- GNU/Linux
- Direct Kernel with autodetected initrd
Super Grub2 Disk – Detect any Operating System – Linux kernels detected - vmlinuz-*
- linux-*
- kernel-genkernel-*
- Debian / Ubuntu / Mint
- Mageia
- Fedora / CentOS / Red Hat Enterprise Linux (RHEL)
- openSUSE / SuSE Linux Enterpsise Server (SLES)
- Arch
- Any many, many, more.
- Direct Kernel with autodetected initrd
- FreeBSD
- FreeBSD (single)
- FreeBSD (verbose)
- FreeBSD (no ACPI)
- FreeBSD (safe mode)
- FreeBSD (Default boot loader)
- EFI files
- Mac OS X/Darwin 32bit or 64bit
Super Grub Disk 2 Iso Download, Super Grub Disk Tutorial, Super Grub Repair Disk, Super Grub Rescue, Super Grub Ubuntu
Grub Config, Grub Error
Install Timeshift in Ubuntu 18.04
How to Use Timeshift to Backup and Restore Linux System
Timeshift is an open-source system restore tool that creates incremental filesystem snapshots using either of 2 modes: BTRFS snapshots or rsync+hardlinks.
With it, you can schedule backups at multiple levels using filters and the backups can be restored from Live CD/USB or directly from the system while it is running.
The goal of Timeshift is to maintain the history and integrity of your file system files and settings and not to back up your media files or documents. To do that, you will need a different backup app.
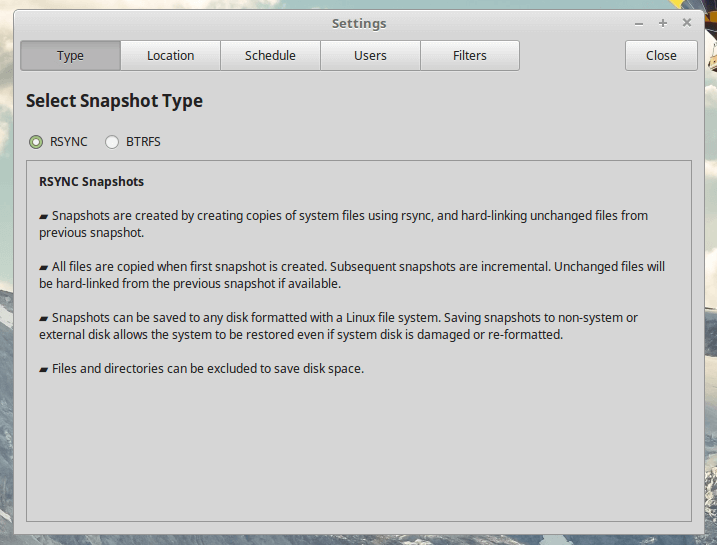
What’s the difference between BTRFS mode and RSYNC mode?
BTRFS Mode creates backups using the BTRFS filesystem’s inbuilt features and the snapshots are supported on only systems that have an Ubuntu-type subvolume layout.
How to Install Timeshift in Linux
Timeshift is comes pre-installed on Linux Mint. To install it on other Linux distributions such as Ubuntu and its derivatives, enter the terminal commands below.
$ sudo add-apt-repository -y ppa:teejee2008/ppa
$ sudo apt-get update
$ sudo apt-get install timeshift
On Arch Linux, you can install Timeshift using yaourt command as shown.
$ sudo yaourt timeshift
On other Linux distributions such as Fedora, CentOS and RHEL, you can download the Timeshift installer and execute it in your terminal.
$ sudo sh ./timeshift*amd64.run # 64-bit
$ sudo sh ./timeshift*i386.run  # 32-bit
Running Timeshift for the first time will launch a setup wizard and on completion, you will be ready to start creating snapshots.
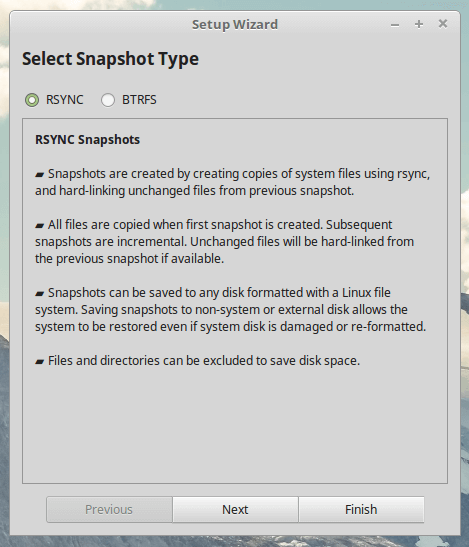
Timeshift Setup Wizard
Timeshift – Linux System Restore
I advise that you reconfigure the app after completing the setup wizard steps so you will be able to select user directories that you want to include or use filters to specify files that you want the backup process to include or ignore.
Timeshift Backup Files
You can always change your settings to fit a different backup scheme from the settings tab.
Within the Settings tab are 5 other tabbed sections: Type, Location, Schedule, Users and Filters.
Timeshift Settings
- Type – select to create snapshots using RSYNC or BTRFS mode.
- Location – select the memory location to which snapshots will be saved.
- Schedule – select how often you want to create snapshots and how many of each category to keep.
- Users – where you can enable user home directory backups since they are disabled by default.
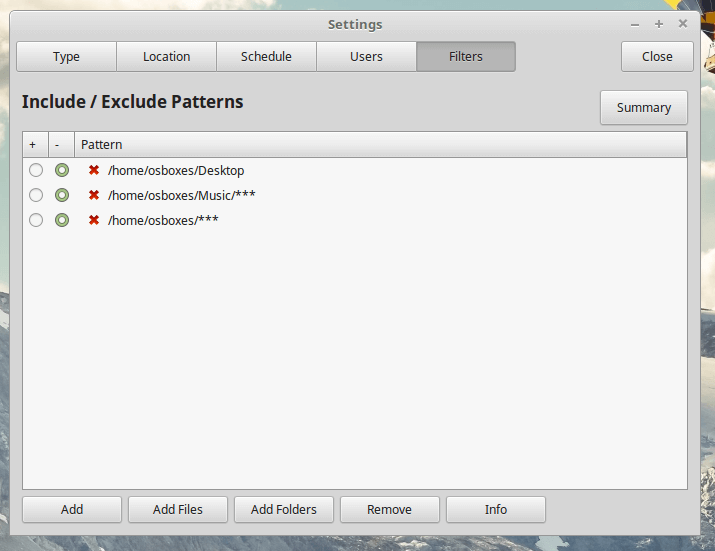
- Filters – where you can select files and directories to exclude from snapshots.
Creating & Restoring Backups Using Timeshift
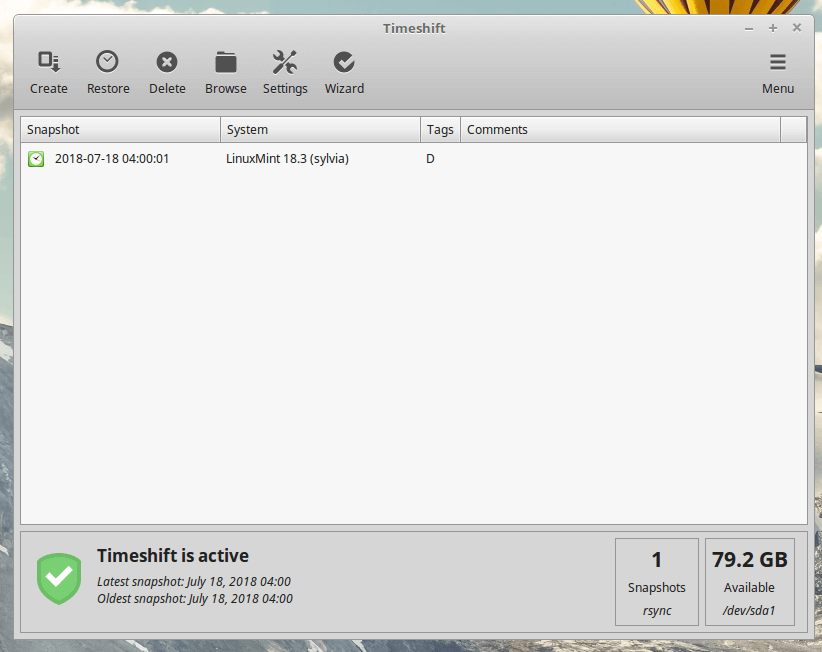
Creating backups is as simple as clicking on the Create button and Timeshift will create a system snapshot using your configured settings.
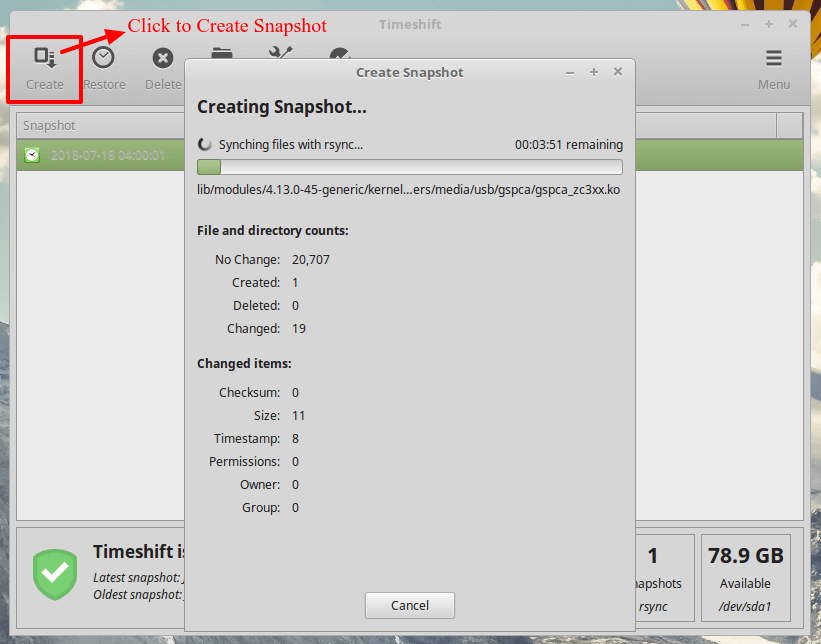
Timeshift Create Linux System Snapshot
All snapshots will be listed in Timeshift’s main screen. Highlight anyone on the list and click the Restore button to revert to a previous time as saved in the snapshot.
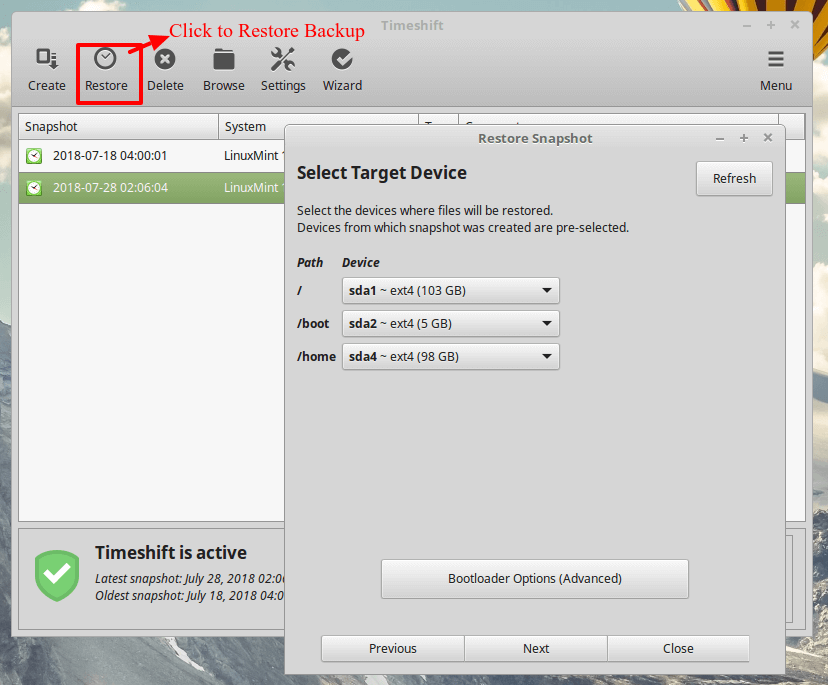
Timeshift Restore Linux System Backup
Remember that using Timeshift, requires you to have a sufficient amount of memory to hold at least 1 snapshot. You can reduce the number of backup levels to as little as 1 by unchecking the backup levels to keep only one selected.
You can reduce the snapshots count in the Schedule tab and set the snapshot number to 5 or less. You can also disable automatic backups and create snapshots manually whenever you need one done.
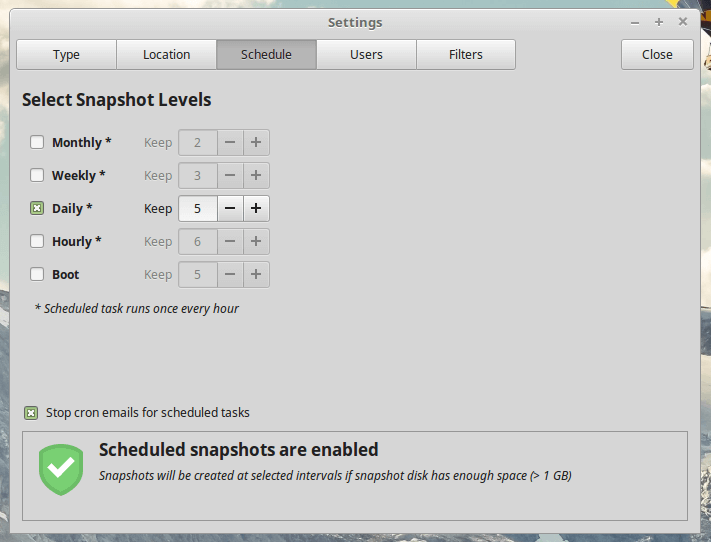
Timeshift Scheduled Backups
As you can see, Timeshift is easy to use thanks to its helpful descriptions and hints.
How much of a Timeshift user are you? Do you use it to also backup your documents and media files or do you use it for only system snapshots and use a different backup tool for your files?
How To Install Timeshift In Ubuntu, How To Install Timeshift In Ubuntu 16.04, How To Install Timeshift In Ubuntu 18.04, Timeshift In Ubuntu, Timeshift On Ubuntu 18.04, Timeshift Ubuntu Tutorial

LibreOffice – latest version via PPA
LibreOffice is a powerful office suite; its clean interface and powerful tools let you unleash your creativity and grow your productivity. LibreOffice embeds several applications that make it the most powerful Free & Open Source Office suite on the market: Writer, the word processor, Calc, the spreadsheet application, Impress, the presentation engine, Draw, our drawing and flowcharting application, Base, our database and database frontend, and Math for editing mathematics.
Writer
Modern text editor Writer possesses all the necessary capabilities of desktop publishing tools. It is easy to learn, but powerful enough to make the book including, in addition to text, images, tables of contents, and more.
Calc
Need everyone the spreadsheet. Beginners will enjoy them in a simple, intuitive interface, professionals will appreciate the extensive functionality. You can import data from a corporate database, and then analyze and process them.
Impress
A great tool to create spectacular multimedia presentations that include 2D and 3D graphics, transitions, animations, and more. Page templates will simplify the preparation of your materials. And downloading ready-made templates, you can save even more time.
Draw
You need to draw a quick sketch, a complex plan diagram or chart? Draw your service. You need to do technically with a drawing or a poster with a page size up to 300 cm? This will cope admirably Draw.
Base
Powerful desktop database, aimed at a wide range of users from various industries. You can create new database using the built-in wizard, and create tables, queries, forms, reports and more.
Math
Built-in LibreOffice equation editor can be used in all types of documents. Allows you without excessive efforts be formatted mathematical and scientific formulas. Formulas can include various indices, mathematical functions, integrals, systems of equations and matrices.

Upgrade to the latest version of LibreOffice in Linux Mint:
Just add the LibreOffice repository to your system
Open a Terminal window and copy and paste the following:
 sudo add-apt-repository ppa:libreoffice/ppa
 sudo apt update
Now, the next system update will install the latest version of LibreOffice, along with other updates. Let’s do it right now via the terminal:
sudo apt upgradeGood Luck!!! May the force be with you!!!
Libreoffice 6.3, Libreoffice Base, Libreoffice Calc, Libreoffice Impress, Libreoffice Install, Libreoffice Writer
Add Ppa Repository In Debian, How To Add Ppa Repository In Ubuntu, Ppa Install Repository
Set Up Time Synchronization On Ubuntu
by ·
You might have set up cron jobs that runs at a specific time to backup important files or perform any system related tasks. Or, you might have configured a log server to rotate the logs out of your system at regular interval time. If your clock is out-of-sync, these jobs will not execute at the desired time. This is why setting up a correct time zone on the Linux systems and keep the clock synchronized with Internet is important. This guide describes how to set up time synchronization on Ubuntu Linux. The steps given below have been tested on Ubuntu 18.04, however they are same for other Ubuntu-based systems that uses systemd’s timesyncd service.
Set Up Time Synchronization On Ubuntu
Usually, we set time zone during installation. You can however change it or set different time zone if you want to.
First, let us see the current time zone in our Ubuntu system using “date” command:
$ date
Sample output:
Tue Jul 30 11:47:39 UTC 2019
As you see in the above output, the “date” command shows the actual date as well as the current time. Here, my current time zone is UTC which stands for Coordinated Universal Time.
Alternatively, you can look up the /etc/timezone file to find the current time zone.
$ cat /etc/timezone
UTC
Now, let us see if the clock is synchronized with Internet. To do so, simply run:
$ timedatectl
Sample output:
Local time: Tue 2019-07-30 11:53:58 UTC
Universal time: Tue 2019-07-30 11:53:58 UTC
RTC time: Tue 2019-07-30 11:53:59
Time zone: Etc/UTC (UTC, +0000)
System clock synchronized: yes
systemd-timesyncd.service active: yes
RTC in local TZ: no
As you can see, the “timedatectl” command displays the local time, universal time, time zone and whether the system clock is synchronized with Internet servers and if the systemd-timesyncd.service is active or inactive. In my case, the system clock is synchronizing with Internet time servers.
If the clock is out-of-sync, you would see “System clock synchronized: no” as shown in the below screenshot.

Time synchronization is disabled.
Note: The above screenshot is old one. That’s why you see the different date.
If you see “System clock synchronized: value set as no, the timesyncd service might be inactive. So, simply restart the service and see if it helps.
$ sudo systemctl restart systemd-timesyncd.service
Now check the timesyncd service status:
$ sudo systemctl status systemd-timesyncd.service
● systemd-timesyncd.service - Network Time Synchronization
Loaded: loaded (/lib/systemd/system/systemd-timesyncd.service; enabled; vendor preset: enabled)
Active: active (running) since Tue 2019-07-30 10:50:18 UTC; 1h 11min ago
Docs: man:systemd-timesyncd.service(8)
Main PID: 498 (systemd-timesyn)
Status: "Synchronized to time server [2001:67c:1560:8003::c7]:123 (ntp.ubuntu.com)."
Tasks: 2 (limit: 2319)
CGroup: /system.slice/systemd-timesyncd.service
└─498 /lib/systemd/systemd-timesyncd

Jul 30 10:50:30 ubuntuserver systemd-timesyncd[498]: Network configuration changed, trying to estab
Jul 30 10:50:31 ubuntuserver systemd-timesyncd[498]: Network configuration changed, trying to estab
Jul 30 10:50:31 ubuntuserver systemd-timesyncd[498]: Network configuration changed, trying to estab
Jul 30 10:50:32 ubuntuserver systemd-timesyncd[498]: Network configuration changed, trying to estab
Jul 30 10:50:32 ubuntuserver systemd-timesyncd[498]: Network configuration changed, trying to estab
Jul 30 10:50:35 ubuntuserver systemd-timesyncd[498]: Network configuration changed, trying to estab
Jul 30 10:50:35 ubuntuserver systemd-timesyncd[498]: Network configuration changed, trying to estab
Jul 30 10:50:35 ubuntuserver systemd-timesyncd[498]: Network configuration changed, trying to estab
Jul 30 10:50:35 ubuntuserver systemd-timesyncd[498]: Network configuration changed, trying to estab
Jul 30 10:51:06 ubuntuserver systemd-timesyncd[498]: Synchronized to time server [2001:67c:1560:800
If this service is enabled and active, your system clock should sync with Internet time servers.
You can verify if the time synchronization is enabled or not using command:
$ timedatectl
If it still not works, run the following command to enable the time synchronization:
$ sudo timedatectl set-ntp true
Now your system clock will synchronize with Internet time servers.
Change time zone using Timedatectl command
What if I want to use different time zone other than UTC? It is easy!
First, list of available time zones using command:
$ timedatectl list-timezones
You will see an output similar to below image.
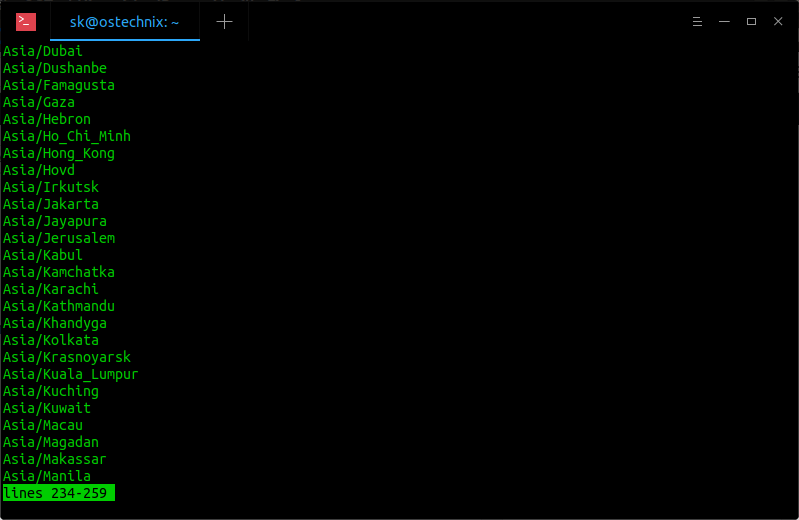
List time zones using timedatectl command
You can set the desired time zone(E.g. Asia/Kolkata) using command:
$ sudo timedatectl set-timezone Asia/Kolkata
Check again if the time zone has been really changed using “date” command:
$ date
Tue Jul 30 17:52:33 IST 2019
Or, use timedatectl command if you want the detailed output:
$ timedatectl
Local time: Tue 2019-07-30 17:52:35 IST
Universal time: Tue 2019-07-30 12:22:35 UTC
RTC time: Tue 2019-07-30 12:22:36
Time zone: Asia/Kolkata (IST, +0530)
System clock synchronized: yes
systemd-timesyncd.service active: yes
RTC in local TZ: no
As you noticed, I have changed the time zone from UTC to IST (Indian standard time).
To switch back to UTC time zone, simply run:
$ sudo timedatectl set-timezone UTC
Change time zone using Tzdata
In older Ubuntu versions, the Timedatectl command is not available. In such cases, you can use Tzdata(Time zone data) to set up time synchronization.
$ sudo dpkg-reconfigure tzdata
Choose the geographic area in which you live. In my case, I chose Asia. Select OK and hit ENTER key.

Next, select the city or region corresponding to your time zone. Here I’ve chosen Kolkata.

Finally, you will see an output something like below in the Terminal.
Current default time zone: 'Asia/Kolkata'
Local time is now: Tue Jul 30 19:29:25 IST 2019.
Universal Time is now: Tue Jul 30 13:59:25 UTC 2019.
Configure time zone in graphical mode
Some users may not be comfortable with CLI way. If you’re one of them, you can easily change do all this from system settings panel in graphical mode.
Hit the Super key (Windows key), type settings in the Ubuntu dash and click on Settings icon.

Launch System’s settings from Ubuntu dash
Alternatively, click on the down arrow located at the top right corner of your Ubuntu desktop and click the Settings icon in the left corner.
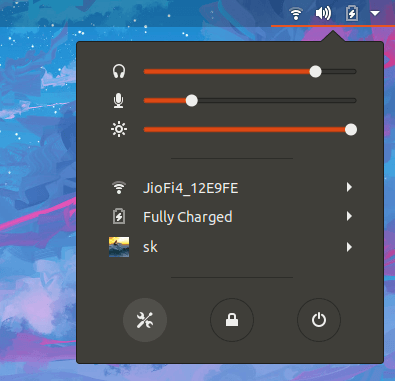
Launch System’s settings from top panel
In the next window, choose Details and then Click Date & Time option. Turn on both Automatic Date & Time and Automatic Time Zone options.
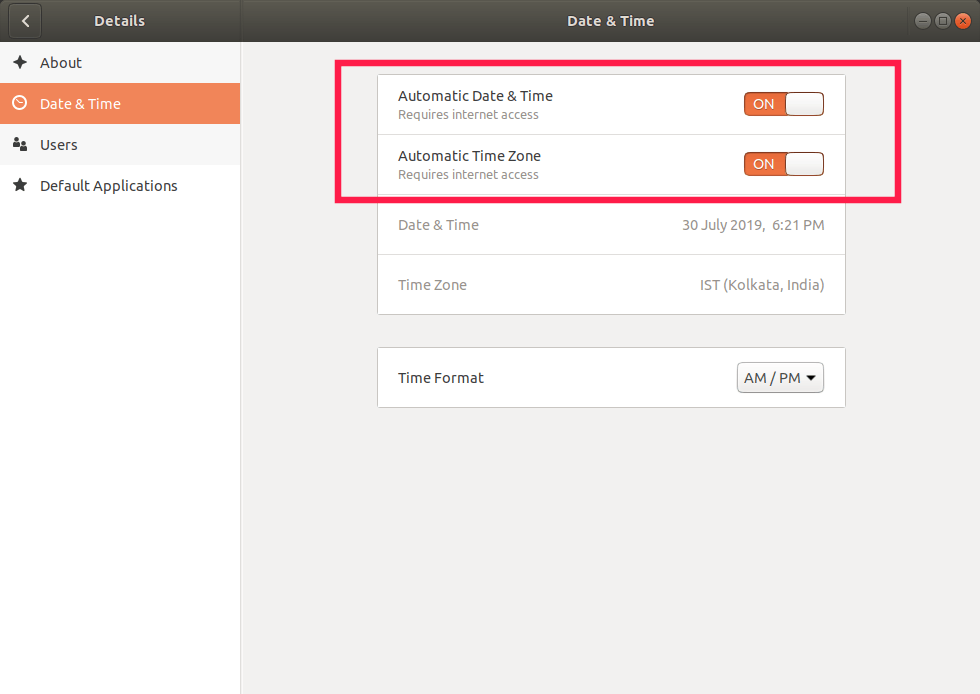
Set automatic time zone in Ubuntu
Close the Settings window an you’re done! Your system clock should now sync with Internet time servers.
Cron Jobs Linux, Cron Jobs On Ubuntu
Sync Time On Ubuntu Server, Time Sync In Ubuntu, Time Synchronization In Ubuntu, Ubuntu Time Sync

Secure a Linux Home Server
There are plenty of reasons to set up a home server. You might use it as a media server, a file server, or even a local backup server. Basically, any files of yours that don’t need to be online are good candidates for a home server. Setting up a Linux-powered home server is relatively easy, especially these days. That said, keeping that server secure is another story altogether. Security can be as tricky, as it is important.
Only Install What You Absolutely Need
One of the easiest ways to keep your home server secure is to keep security in mind from the very beginning. This starts with installation. Are you unsure if you need an application or service? Don’t install it. You can always install it later.
If you’ve installed Linux a few times, this is even easier. Instead of sticking with the defaults, use the modes that give you the most control over installation. Sometimes these are named “expert mode” or something similar.
Carefully keeping track of install options can save you time disabling services for security reasons later.
Configure sudo
Before you move on to any other steps, you need to configure sudo. Why? Because once we’re done here, you’ll log into your server via SSH, and you won’t be able to log in as the root account. To make any further changes to your system, you’ll need to use sudo.
First, check to see if you’re already able to use sudo. From your user account, run the following with your username instead of USERNAME:
sudo -lU USERNAME
If you see a message displayed stating that your username can run “(ALL) ALL,” or something similar, you’re ready to move on.
Now, as the root account on your server, run the following to edit the “/etc/sudoers” file. If you prefer another editor, use it instead of nano.
EDITOR=nano visudo
Edit the file to include the following, with your username instead of USERNAME:
USERNAME ALL=(ALL) ALL
Configure SSH

You may already have SSH enabled on your home server. You likely do, in fact, as this is typically the way you interact with a server.
First, make sure OpenSSH is installed. If you use another distribution, your command will vary, but the package name should be fairly consistent. On Ubuntu, run the following:
sudo apt install openssh-server
Using key-based authentication is much more secure than password authentication, so we’ll set up SSH to work this way. To do this, make sure you’re working on a client you plan to connect to the server with, not the server itself. First, you want to make sure you don’t already have any SSH keys:
ls ~/.ssh/
If you see “id_rsa” and “id_rsa.pub” among the filenames listed, you already have SSH keys. Skip this next step.
ssh-keygen -t rsa -b 4096 -C "youremail@domain.com"
Now you’ll copy the SSH key to your server:
ssh-copy-id USERNAME@SERVER
For a home server, you may likely be using an IP address for your server instead of a name. If you don’t know your server name, use your IP address instead of SERVER above.
Now we’ll edit your SSH settings to secure them more. Log into your server from the client on which you created the keys. This will enable you to log in again after this step.Run the following, replacing nano with the editor of your choice.
sudo nano /etc/ssh/sshd_config
Edit the file and with the following settings. These will be located in various places in the file. Make sure there are no duplicates, as only the first instance of a setting will be followed.
ChallengeResponseAuthentication no
PasswordAuthentication no
UsePAM no
PermitRootLogin no
Now you need to restart the SSH server with one of the following commands.
On Ubuntu, run:
sudo systemctl restart ssh

Read More
Best Linux For Home Web Server, Best Linux Home Server Os, Best Linux Home Server Software, Linux Home Cloud Server, Linux Home Server Distro, Linux Home Server How To, Linux Home Server Setup, Linux Home Server Ubuntu