Posts by Bob L

Opera for Android VPN
More than a month ago, we were celebrating the release of an integrated VPN in the beta version of the Opera browser. We predicted that this release was a step toward its inclusion in the final version of Opera Browser. A fact that we can now celebrate given that the version 51.0.2461.137360 of the browser now offers a free integrated VPN. And of course, you can download it right now from Uptodown.
It’s never a bad idea to have a little extra security when it comes to browsing the web. This is especially important to keep in mind when connecting through public WiFi networks. Back in the day, we mourned the shutdown of Opera VPN and that’s why we’re so happy about finding similar features through the company’s browser. We read in Opera’s blog that this VPN service stands out for being free, easy to use, and doesn’t track your activity. All features that we saw in its beta, but it’s always nice to be reminded.

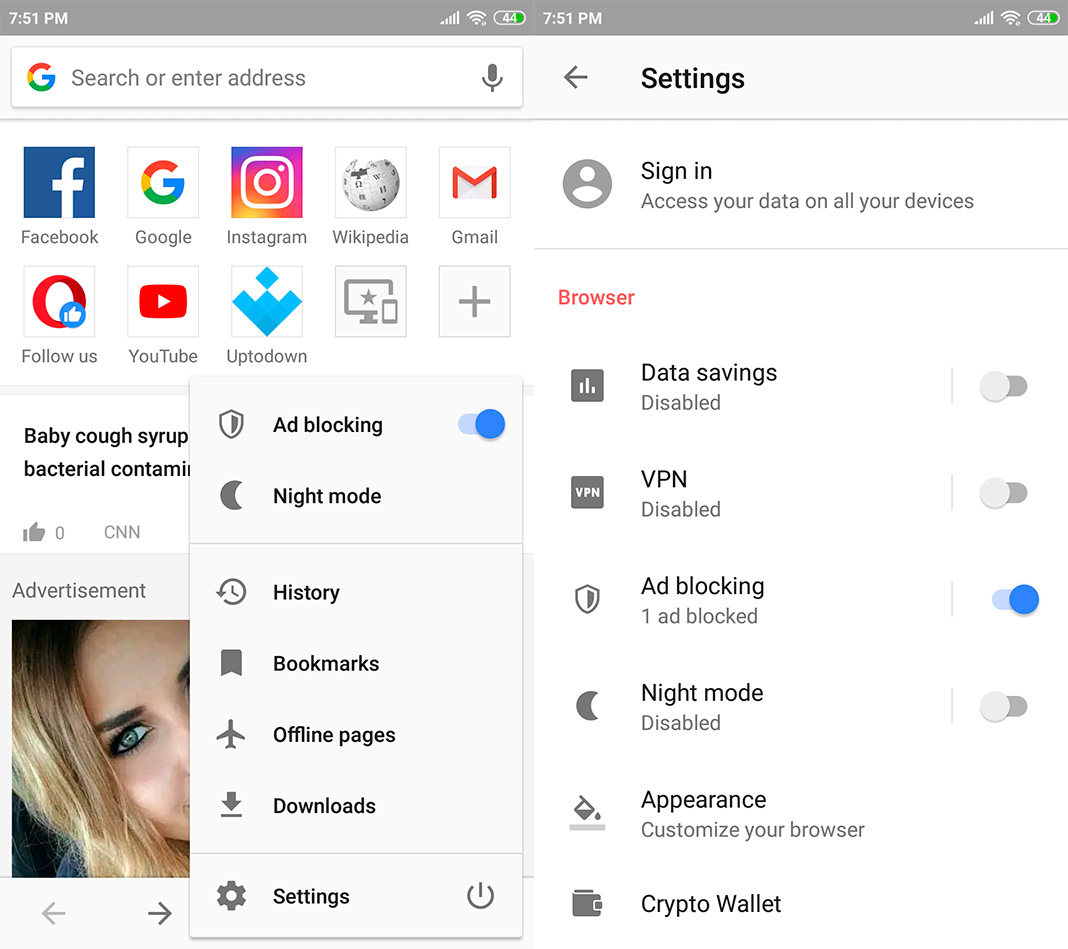
When Opera says this integrated VPN is easy to use, we couldn’t agree more: you just have to activate the VPN button to start using it instantly. You just have to follow these simple steps:
- Tap the options button in the browser (The Opera symbol in the lower right corner).
- Access the settings (the last option available).
- Enable the VPN connection by tapping the icon to the right.
- Done!
These steps will only take a couple seconds to complete. Honestly, it’ll take you longer to read the instructions we’ve given you. But if you need a more visual explanation, you can check out the images below.
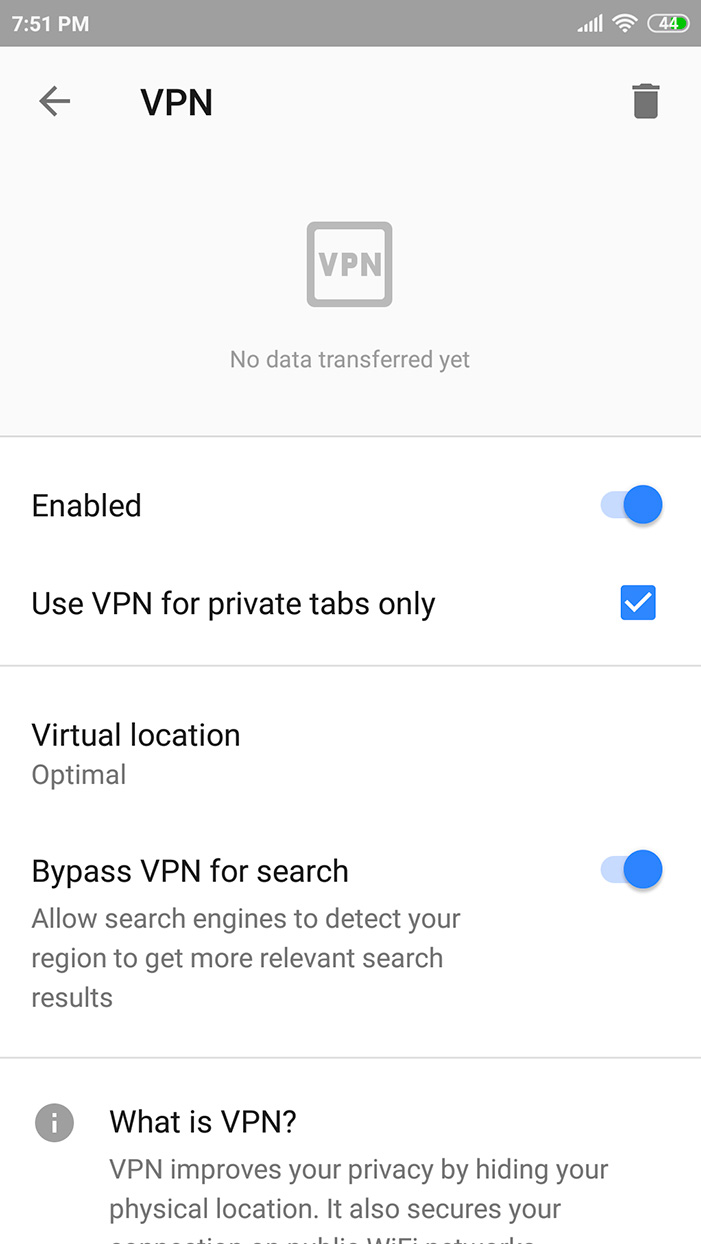
The Opera browser also lets you customize its options a little bit: select the browsing location (Optimal, America, Asia, and Europe), omit the VPN connection for searches, and choose if you only want to use it in private tabs. It’s simple and any user can use these options without a single problem.
Thanks to this new feature, the Opera browser stands out from the competition. Although we recommend the use of well-known VPNs and they tend to be paid, the truth is that we couldn’t find anything wrong with Opera. This brand has always been synonymous with quality.
Opera Browser for Android [APK] | Download
Full Article Link
Android Vpn App, Android Vpn Browser
Opera Web Browser, Opera Web Browser Android, Opera Web Browser Install, Opera Web Browser Standalone, Opera Web Browser Website

Firefox 65 Enhances Security on Linux
Mozilla officially released today the Firefox 65 web browser for all supported platforms, including Linux, Android, macOS, and Windows, adding yet another layer of enhancements and optimizations to make your browsing experience better.
With the Firefox 65 release, Mozilla enhanced the security of its open-source web browser on Linux platforms by enabling “Stack smashing” protection by default, which could allow malicious actors to take control or corrupt a vulnerable program. The “Stack smashing” protection is also enabled for Android and macOS platforms.
Apart from the stronger “Stack Smashing” protection, the Firefox 65 release also enhances the tracking protection by offering users stricter, custom, and standard options for controlling online trackers through a revamped Content Blocking section shown in the site information panel.
Firefox Security, Firefox Security And Privacy, Firefox Security Features, Firefox Security Options, Firefox Security Release, Firefox Security Tools, Firefox Ubuntu Security Updates

List Installed Packages on Debian
Apt is a command-line interface for the package management system and combines the most commonly used functionalities from apt-get and apt-cache including option to list installed packages.
To lists all packages installed on your system run the following command:
sudo apt list --installedadduser/stable,now 3.115 all [installed] apt/stable,now 1.4.8 amd64 [installed] apt-listchanges/stable,now 3.10 all [installed] apt-utils/stable,now 1.4.8 amd64 [installed] autoconf/stable,now 2.69-10 all [installed] automake/stable,now 1:1.15-6 all [installed] autotools-dev/stable,now 20161112.1 all [installed,automatic] base-files/stable,now 9.9+deb9u5 amd64 [installed] base-passwd/stable,now 3.5.43 amd64 [installed] bash/stable,now 4.4-5 amd64 [installed]
The command will display a list of all installed packages including information about the packages versions and architecture. The rightmost column in the output shows whether the package was automatically installed as dependency of another package.
Since the packages list is long it is a good idea to pipe the output to the less command to make it easier to read:
sudo apt list --installed | less
To find out whether a specific package is installed use the grep command to filter the output. For example to find whether the tmux package is installed on the system you can use:
sudo apt list --installed | grep tmuxtmux/stable,now 2.3-4 amd64 [installed]The output above shows that you have screen tmux 2.3-4 installed on your system.
List Installed Packages with dpkg-query
dpkg-query is a command line that can be used to display information about packages listed in the dpkg database.
To get a list of all installed packages type:
sudo dpkg-query -l | less
The command will display a list of all installed packages including the packages versions, architecture and short description.
You can filter the dpkg-query -l output using the grep command:
sudo dpkg-query -l | grep package_name_to_searchCreate a List of all Installed Packages
The following command will store the list of all installed packages on your Debian system to a file called packages_list.txt:
sudo dpkg-query -f '${binary:Package}n' -W > packages_list.txtNow that you have the list, you can install the same packages on your new server with:
sudo xargs -a packages_list.txt apt installTo find out how many packages are installed on your system you can use the same command as when creating a packages list but instead of redirecting the output to a file you can pipe it to the wc command to count the lines:
sudo dpkg-query -f '${binary:Package}n' -W | wc -lThe output will show the number of the installed packages:
466Apt-get Add Repository
Debian Apt, Debian Linux, Debian Or Ubuntu, Debian Packages, Debian Ubuntu

Fix Broken Packages in Ubuntu
How to Fix Broken Packages in Ubuntu
Apt, Ubuntu’s package manager, is among the most powerful and intuitive, but that doesn’t mean that things can’t go wrong. Occasionally, a package install goes wrong on Ubuntu, and you’re left to pick up the pieces. It’s a good thing Ubuntu’s package utilities, including Apt itself, have built-in functionality to help remedy the situation and get things back to normal.
These tips and tricks should help you get unstuck in most instances. They’re all fairly universal, but every situation is different, so keep that in mind when trying to debug your own situation.
Related: How to Fix Ubuntu Update Errors
With Apt/Apt-Get
Apt has a couple of flags that you can use in order to fix missing dependencies or packages that broke for one reason or another during install. A common use here would be installing a third-party .deb and finding that it had dependencies you didn’t know about. Those dependencies probably won’t be pulled in on their own, and dpkg will complain that the package is missing in them. In any case, you can try these steps.

First, run an update to make sure that there aren’t newer versions of the required packages.
sudo apt update --fix-missing
Next, you can try forcing Apt to look for and correct any missing dependencies or broken packages. This will actually install any missing packages and repair existing installs.
sudo apt install -f
With DPKG
Another place where error can pop up in package installations is the configuration process. Behind the scenes, dpkg is taking care of this part, not Apt, so it would stand to reason that when a package fails during configuration, dpkg is the tool to turn to in order to fix it.

Start by trying to force dpkg to reconfigure any broken or partially configured packages.
sudo dpkg --configure -a
If that doesn’t solve the problem, you can take a more forceful approach. Start by listing any packages that dpkg marked as requiring a reinstall.
sudo dpkg -l | grep ^..r
You should see the problematic package(s) there. As long as there’s nothing that seems not to belong there, you can force-remove the broken packages.
sudo dpkg --remove --force-remove--reinstreq
When dpkg is done, try to clean up with Apt.
sudo apt clean
sudo apt update
With any luck that’ll get you back to where you started. It won’t get you the broken packages that you tried to install, but at least Apt will be functional again.
Related: Ubuntu Software Center Not Working? Here Are the Fixes
Permanent DPKG Lock

There’s a less common issue with ridiculous dpkg locks preventing you from doing anything. Every time you try to use Apt or dpkg, you get an error saying another application already is … when it isn’t. It’s actually easy to delete the lock file preventing you from using Apt and get back to doing what you need to. Sometimes these lock files remain in place after an error occurs in an install, derailing the process and preventing the file from being removed automatically. In this case, you’ll need to do it yourself.
sudo rm /var/lib/apt/lists/lock
For good measure, delete the lock in cache.
sudo rm /var/cache/apt/archives/lock
Conclusion
Hopefully, one of these fixes worked for you, and you’re back working on Ubuntu normally. Remember that the best way to handle a totally out-of-hand situation is to try to return to the way it was before. Don’t try to power through and add more things to solve a breakage by adding more things, unless you know exactly what you’re doing. Chances are you’ll end up with a tangled mess of broken things that’ll be harder to sort out.

Install GNOME Extensions
By: M.HANNY SABBAGH
You main way to install GNOME extensions will be via the extensions.gnome.org website. It’s an official platform belonging to GNOME where developers publish their extensions easily so that users can install them in a single click.
In order to for this to work, you’ll need two things:
- Browser Add-on: You’ll need to install a browser add-on that allows the website to communicate with your local GNOME desktop. You install it from here for Firefox, or here for Chrome or here for Opera.
- Native Connector: You still need another part to allow your system to accept installing files locally from your web browser. To install this component, you must install the chrome-gnome-shell package. Do not be deceived! Although the package name is containing “chrome”, it also works on Firefox too. To install it on Debian/Ubuntu/Mint run the following command in terminal:
sudo apt install chrome-gnome-shell
For Fedora:
sudo dnf install chrome-gnome-shell
For Arch:
sudo pacman -S chrome-gnome-shell
After you have installed the two components above, you can easily install extensions from the GNOME extensions website.
How to Configure GNOME Extensions Settings?
Many of these extensions do have a settings window that you can access to adjust the preferences of that extension. You must make sure that you have seen its options at least once so that you know what you can possibly do using that extension.
To do this, you can head to the installed extensions page on the GNOME website, and you’ll see a small options button near every extension that offers one:

Clicking it will display a window for you, from which you can see the possible settings:

Read our article below for our list of recommended extension!
General Extensions
1. User Themes

This is the first must-install extension on the GNOME Shell interface, it simply allows you to change the desktop theme to another one using the tweak tool. After installation run gnome-tweak-tool, and you’ll be able to change your desktop theme.
Installation link: https://extensions.gnome.org/extension/19/user-themes/
2. Dash to Panel

Converts the GNOME top bar into a taskbar with many added features, such as favorite icons, moving the clock to right, adding currently opened windows to the panel and many other features. (Make sure not to install this one with some other extensions below which do provide the same functionality).
Installation link: https://extensions.gnome.org/extension/1160/dash-to-panel/
3. Desktop Icons

Restores desktop icons back again to GNOME. Still in continues development.
Installation link: https://extensions.gnome.org/extension/1465/desktop-icons/
4. Dash to Dock

If you are a fan of the Unity interface, then this extension may help you. It simply adds a dock to the left/right side of the screen, which is very similar to Unity. You can customize that dock however you like.
Installation link: https://extensions.gnome.org/extension/307/dash-to-dock/
Productivity Extensions
5. Todo.txt

For users who like to maintain productivity, you can use this extension to add a simple To-Do list functionality to your desktop, it will use the syntax from todotxt.com, you can add unlimited to-dos, mark them as complete or remove them, change their position beside modifying or taking a backup of the todo.txt file manually.
Installation link: https://extensions.gnome.org/extension/570/todotxt/
6. Screenshot Tool

Easily take a screenshot of your desktop or a specific area, with the possibility of also auto-uploading it to imgur.com and auto-saving the link into the clipboard! Very useful extension.
Installation link: https://extensions.gnome.org/extension/1112/screenshot-tool/
7. OpenWeather

If you would like to know the weather forecast everyday then this extension will be the right one for you, this extension will simply add an applet to the top panel allowing you to fetch the weather data from openweathermap.org or forecast.io, it supports all the countries and cities around the world. It also shows the wind and humidity.
Installation link: https://extensions.gnome.org/extension/750/openweather/
8 & 9. Search Providers Extensions

In GNOME, you can add what’s known as “search providers” to the shell, meaning that when you type something in the search box, you’ll be able to automatically search these websites (search providers) using the same text you entered, and see the results directly from your shell!
YouTube Search Provider: https://extensions.gnome.org/extension/1457/youtube-search-provider/
Wikipedia Search Provider: https://extensions.gnome.org/extension/512/wikipedia-search-provider/
Workflow Extensions
10. No Title Bar

This extension simply removes the title bar from all the maximized windows, and moves it into the top GNOME Panel. In this way, you’ll be able to save a complete horizontal line on your screen, more space for your work!
Installation Link: https://extensions.gnome.org/extension/1267/no-title-bar/
11. Applications Menu

This extension simply adds a classic menu to the “activities” menu on the corner. By using it, you will be able to browse the installed applications and categories without the need to use the dash or the search feature, which saves you time. (Check the “No hot corner” extension below to get a better usage).
Installation link: https://extensions.gnome.org/extension/6/applications-menu/
12. Places Status Indicator

This indicator will put itself near the left corner of the activities button, it allows you to access your home folder and sub-folders easily using a menu, you can also browse the available devices and networks using it.
Installation link: https://extensions.gnome.org/extension/8/places-status-indicator/
13. Window List

Officially supported by GNOME team, this extension adds a bottom panel to the desktop which allows you to navigate between the open windows easily, it also include a workspace indicator to switch between them.
Installation link: https://extensions.gnome.org/extension/602/window-list/
14. Frippery Panel Favorites
![]()
This extensions adds your favorite applications and programs to the panel near the activities button, allowing you to access to it more quickly with just 1 click, you can add or remove applications from it just by modifying your applications in your favorites (the same applications in the left panel when you click the activities button will appear here).
Installation link: https://extensions.gnome.org/extension/4/panel-favorites/
15. TopIcons

Those extensions restore the system tray back into the top GNOME panel. Very needed in cases of where applications are very much dependent on the tray icon.
For GNOME 3.28, installation link: https://extensions.gnome.org/extension/1031/topicons/
For GNOME 3.30, installation link: https://extensions.gnome.org/extension/1497/topicons-redux/
16. Clipboard Indicator

A clipboard manager is simply an applications that manages all the copy & paste operations you do on your system and saves them into a history, so that you can access them later whenever you want.
This extension does exactly this, plus many other cool features that you can check.
Installation link: https://extensions.gnome.org/extension/779/clipboard-indicator/
Other Extensions
17. Frippery Move Clock
![]()
If you are from those people who like alignment a lot, and dividing the panels into 2 parts only, then you may like this extension, what it simply does is moving the clock from the middle of the GNOME Shell panel to the right near the other applets on the panel, which makes it more organized.
Installation link: https://extensions.gnome.org/extension/2/move-clock/
18. No Topleft Hot Corner
If you don’t like opening the dash whenever you move the mouse to the left corner, you can disable it easily using this extension. You can for sure click the activities button if you want to open the dash view (or via the Super key on the keyboard), but the hot corner will be disabled only.
Installation link: https://extensions.gnome.org/extension/118/no-topleft-hot-corner/
19. No Annoyance
Simply removes the “window is ready” notification each time a new window a opened.
Installation link: https://extensions.gnome.org/extension/1236/noannoyance/
20. EasyScreenCast

If you would like to quickly take a screencast for your desktop, then this extension may help you. By simply just choosing the type of recording you want, you’ll be able to take screencasts any time. You can also configure advanced options for the extension, such as the pipeline and many other things.
Installation link: https://extensions.gnome.org/extension/690/easyscreencast/
21. Removable drive Menu

Adds an icon to the top bar which shows you a list of your currently removable drives.
Installation link: https://extensions.gnome.org/extension/7/removable-drive-menu/
22. BottomPanel

As its title says.. It simply moves the top GNOME bar into the bottom of the screen.
Installation link: https://extensions.gnome.org/extension/949/bottompanel/
23. Unite
If you would like one extension only to do most of the above tasks, then Unite extension can help you. It adds panel favorites, removes title bar, moves the clock, allows you to change the location of the panel.. And many other features. All using this extension alone!
Installation link: https://extensions.gnome.org/extension/1287/unite/
Conclusion
This was our list for some great GNOME Shell extensions to try out. Of course, you don’t (and shouldn’t!) install all of these, but just what you need for your own usage. As you can see, you can convert GNOME into any form you would like, but be careful for RAM usage (because if you use more extensions, the shell will consume very much resources).
Gnome Extensions, Gnome Extensions Chrome, Gnome Extensions Clock, Gnome Extensions Install, Gnome Extensions Install Ubuntu, Gnome Extensions On Ubuntu 18.04, Gnome Extensions Openweather, Gnome Extensions Top, Gnome Extensions Topicons, Gnome Extensions Ubuntu 18.04, Gnome Extensions Weather

Using Snap Packages In Ubuntu
Brief: A beginner’s guide to using Snap packages in Ubuntu or any other Linux distribution. You can also download a free cheat sheet for quick reference.
Canonical introduced a new packaging system called Snap packaging in Ubuntu 16.04 LTS. It claims to be more stable and secure.
However, that secure part of the claim is debatable as a developer shows how easily its security can be circumvented using X11. Debates apart, let’s see what is Snap packaging and how to use Snap packages in Ubuntu or other Linux distributions.
What are Snap packages?
First, what is ‘packaging’? There are several ways you can install programs in Linux systems. One way is to install it from source code. In here, you manually run the scripts, build dependencies etc. Not user-friendly at all.
This is where ‘packages’ come into the picture. After developing the program, developers ship them in “software packages” so that it can be easily installed. .deb (Debian software packaging) got popular for this reason. The binaries are available in the .deb, one-to-two clicks, and the software is installed.
Now, what was the need for another packaging system for Ubuntu when it is based on Debian and .deb is heavily used in Ubuntu as well? Canonical did it for convergence (similar user experience on a variety of devices) and it is being used in Drones and other similar IoT projects.
From its official website:
A
.snappackage for the Ubuntu Core system contains all its dependencies. This has a couple of advantages over traditionaldeborrpmbased dependency handling, the most important being that a developer can always be assured that there are no regressions triggered by changes to the system underneath their app.
How to use Snap packages in Ubuntu and other Linux distributions

Enough talking about Snap packaging. Let’s see how you could use Snap packages in Ubuntu.
First thing first, make sure that your system has snap support enabled. In Ubuntu based Linux distributions, try the command below:
sudo apt install snapdPlease refer to this article to see how to enable Snap support in other Linux distributions.
I presume that you have experience with our popular “apt-get” commands. If not, I recommend reading my other beginner’s guide to apt-get commands in Linux.
Snap is similar to that. It can be used in the terminal and provides a basic set of commands.
1. Finding Snap packages to install
Before we see the command line way, let me tell you about the GUI way. Snap packages are available in Ubuntu Software Center. However, you cannot filter them from the rest of the apps.
If you want to find various Snap apps, you can visit the official Snap website from Ubuntu. You can search by application names here.
To find Snap packages in the terminal, use the following command:
snap find <search_text>The good thing about the above command is that the search query need not to be exactly the same as the package name. It finds all the matching content with that search query.

2. Install Snap packages
Once you have found your desired Snap package, you can install the Snap package using the command below:
sudo snap install <package>
You can also use auto-completion option by hitting tab to show packages starting with the string you typed.
3. Keep track of Snap packages
You can also list all the Snap packages installed on your system:
snap list
As you can see, Ubuntu core in Ubuntu 16.04 is already using Snap.
Snap also provides you a history of the changes made to your system with Snap. Use the command below:
snap changes
It shows all the recent changes I did to my system with Snap.
4. Upgrade and downgrade Snap packages
Snap packages are automatically updated. And installed Snap packages normally checks for updates four times a day and then installs it automatically.
You can also do it manually. If you want to upgrade a Snap package to a newer version manually, use the command below:
sudo snap refresh <package>
If the package is already the newer version, it will throw an error.
To see which Snap packages have updates ready to be installed, you can use the command below:
sudo snap refresh --listFor some reason, if you did not like a recent updated Snap package, you can revert it to the previously installed version with this command:
sudo snap revert <package>5. Remove Snap packages
Finally, you can remove a Snap package using this command:
sudo snap remove <package>
At the time of writing this article, Snap doesn’t support auto-completion like apt and apt-get do.
If you prefer videos, here is a quick video on our YouTube channel:
6. Changing channels to switch between beta, release candidate and daily build version
Snap also has a feature called channels. By default, Snap packages are installed from the ‘stable’ channel. But there are few other channels that give you access to the development version of a program. It’s like switching branches in git, if you are familiar with software development.
These channels are:
- stable: The latest stable release of an application
- candidate: The release candidate (RC) of an application that is reaching the stable version
- beta: Unstable version that has reached a certain milestone
- edge: Daily/nightly build of an application under development
Needless to say that you should stay on the Stable channel but if you really want to change to another channel, you can use Snap command in the following fashion:
sudo snap refresh <package> --channel=<channel_name>Once you changed the channel, your installed package will get updates from that channel. You can switch back to the old channel either by using the refresh command as shown above or simply use the revert command shown in section four.
7. Install Snap apps offline
You can also install Snap applications without internet. But first, you need to download the files related to Snap applications on Linux system connected to the internet. You can do that using the command below:
snap download <package_name>This will download a .assert and a .snap file. You can copy these files to the other Linux system which is not connected to the internet. And then you can install it using the command:
snap ack <package_name.assert>
snap install <package_name.snap>
Bear in mind they also may need to “snap download” the “core” snap and if needed a content snap such as “gnome-3-26-1604” which are needed by some of the GNOME snaps.
Note: Commands and option may change
Snap is under continuous development. This has resulted in the change of commands and its options. There have been several changes to the commands since this article has been first published.
The option to upgrade all installed Snap packages has now gone among other such changes. So if you notice other such changes, please notify me so that I can update the article accordingly.
How to run Snap applications
A few readers have rightly pointed out that I didn’t mention how to run the Snap applications. Well, you can run Snap applications like any other application installed on your system.
Look for them in the menu, try command line (you’ll have to guess their run command, normally the name of the application) etc.
Worth a Snap?
Initially, there were not many Snap packages available. But Snap adoption has picked up speed, especially when Canonical is pushing for it so hard. They have created Snapcraft tool so that it will be easier for developers to make Snap packages out of their programs.
If you liked this guide to use Snap packages in Ubuntu, I recommend reading my other beginner’s guide to apt-get commands in Linux.
Best Snap Packages Ubuntu, How Snap Packages Work, How To Remove Snap Packages In Ubuntu, Installing Snap Packages On Ubuntu, Open Snap Packages, Snap Packages Ubuntu, Snap Update All Packages, Top Snap Packages, Ubuntu Snap Packages List
Install Newer Software in Debian
Debian is an excellent Linux distribution, especially for servers. It is also a great distribution to run on a regular desktop computer or laptop. You very rarely encounter a bug on this operating system, and packages integrate exceptionally well with one another.
For example, you can easily switch to a different display/login manager, add another desktop environment or change other key components of your software stack. In contrast, you might get weird conflicts on other distributions when trying to switch default packages.
Why Debian Has Old Software
Here’s the short version, without too many technical details. Once most of the known bugs are removed, packages are frozen to a particular version. Most of them will never receive feature upgrades, only security fixes. This way, no new bugs get introduced, and the distribution can remain “stable.” To be stable means that what worked in a certain way one year ago will work exactly the same way next year on the same version of Debian. The advantage is that you get an operating system that (almost) never “breaks.” You can pull in the latest security fixes, and rest assured that your laptop or computer will work just fine the next day.
You don’t lose a lot by not having the latest version of everything. Most software doesn’t dramatically change in the course of two years. But some software does indeed change often and brings important improvements.
Sometimes, you may even require the latest version of something. This may be the case with a new video card you bought that doesn’t work without the latest driver. For such situations, Debian has a special repository where you can upgrade certain pieces of software that you absolutely need to have.
What Are Debian Backports?
Here’s how Debian’s official backports webpage describes what back-porting means:
Backports are packages taken from the next Debian release (called “testing”), adjusted and recompiled for usage on Debian stable.
This repository is not enabled by default, but the steps to do so are fairly straightforward.
How to Enable Backports Repository on Debian
Open a terminal emulator, and find the codename of your Debian installation:
lsb_release -sc

Note: in this example the code-name is “stretch.” If at the time you read this the codename is different, for example “buster,” replace every occurrence where you see “stretch” with “buster.”
Debian’s APT package manager stores the list of repositories where it can download software in a file. View and edit this file with the following command:
sudo apt edit-sources
At the end of the file, add the following line:
deb http://deb.debian.org/debian stretch-backports main contrib non-free
On Debian Buster the line would be: “deb http://deb.debian.org/debian buster-backports main contrib non-free.”

Your APT sources list might not include the words “contrib” and “non-free.” In this case it means you don’t have some packages available. Among other things, such as the RAR archiver or Steam game platform, you will find drivers for your video card, Wi-Fi adapter and other hardware in “non-free.” If you need these, for example to play 3D video games or if your Wi-Fi isn’t working, enable “contrib” and “non-free.” Simply add the words at the end of each line, after “main.” The following is some text you can copy and paste:
deb http://deb.debian.org/debian stretch main contrib non-free
deb http://deb.debian.org/debian stretch-updates main contrib non-free
deb http://deb.debian.org/debian-security stretch/updates main contrib non-free

deb http://deb.debian.org/debian stretch-backports main contrib non-free
Your sources.list file might also contain different URLs instead of “deb.debian.org.” Use “deb.debian.org,” as it has some advantages. It dynamically redirects you to a server close to you. Since it won’t always redirect you to the same server, there’s another advantage. If you use a static address, such as ” ftp.uk.debian.org/debian/,” if the server goes down, you won’t be able to download packages for that time.
With “deb.debian.org” that should no longer be an issue. It helps a lot, especially if you enable automatic upgrades. With a static server you might notice that your computer hasn’t been automatically updating for days or weeks, while the server was offline.
Empty Screen After Running “sudo apt edit-sources”
On some installations the default file “/etc/apt/sources.list” might be missing. In this case sudo apt edit-sources will show an empty screen. Repositories might be stored in a file at “/etc/apt/sources.list.d/base.list” instead. With the following commands, you can see files in that directory and their contents:
ls /etc/apt/sources.list.d/
cat /etc/apt/sources.list.d/*
When you edit the default sources file with sudo apt edit-sources, don’t repeat the lines you see here. Only add what is missing. Copy the lines from those files, add them to “/etc/apt/sources.list” and then delete the files in “/etc/apt/sources.list.d/.”
How to Install Software from Debian Backports
Make the package manager pick up on your recent changes and update its database:
sudo apt update

On Debian 9, codenamed Stretch, to install a newer Nvidia driver from backports, you would use this command:
sudo apt -V -t=stretch-backports install nvidia-driver
On Debian 10, codenamed Buster, the command would be:
sudo apt -V -t=buster-backports install nvidia-driver

It’s not required to use the -V parameter, but it is useful in this case. This makes APT show version strings of the packages that it will install. It makes it easier to spot which packages will be pulled from backports and which will be pulled from regular repositories. Packages that contain the string “bpo” are from backports.
Find Versions Available for a Package
Not all packages have backports available. Only the ones which have important or necessary features in new versions are usually backported. You can quickly check if you can install a newer version for a package with the following command:
apt policy nvidia-driver

In this case you can see that Nvidia’s proprietary driver version 384 is available in Debian’s regular repository. A superior version, 390, is available in backports.
Debian’s list of backported packages can also help you check if a package has a backport available. Remember to adjust the URL in the future with the codename of your current Debian release. “https://packages.debian.org/stretch-backports/allpackages” will be “https://packages.debian.org/buster-backports/allpackages.”
Conclusion
Consider upgrading an emergency method from backports. This means don’t overdo it. Install only the packages you really need, otherwise you might make your system unstable or generate conflicts between packages.
Debian Backports, Debian Stretch Backports
Debian 9 Backports Install, Debian Backports, Debian Backports Apt, Debian Backports Install, Debian Backports Jessie, Debian Backports Repository

5 Simple Ways To Free Up Space on Ubuntu – Debian
5 Simple Ways To Free Up Space on Ubuntu
A bit of maintenance can make heaps more room
Scott BouvierUpdated 9 August 2016

Let’s go beyond the obvious
Let’s say you need to free up some space on Ubuntu — how do you go about it?
Unlike Windows, with its built-in defrag and disk clean-up tools, Ubuntu doesn’t make it immediately obvious how you go about trying to free up space.
What do you do once you’ve emptied the trash, and deleted those .ISO downloads? How do you recover more space?
We’re going to show you 5 super simple (and in some cases blindingly obvious if easily forgotten) steps you can take to get back those GBs, materialise more MBs, and clean out the stale KBs.
Whenever you need more space — and heck, even if you don’t — here are 5 simple ways to free up disk space on Ubuntu.
1. Clean the APT Cache (And Do It Regularly)
It sounds so obvious, and yet chances are you haven’t done this.
By default Ubuntu keeps every update it downloads and installs in a cache on your disk, just in case you ever need it again.
This is useful if you regularly add and remove apps, find yourself needing to reconfigure/reinstall a specific package, or have a poor connection.
But the flip side is that the apt package cache can quickly swell to several hundred MBs. This command tells you how big your apt cache is:
du -sh /var/cache/apt/archives
To clean the apt cache on Ubuntu simply run the following command.
sudo apt-get clean
The apt clean command removes ALL packages kept in the apt cache, regardless of age or need. If you’re on a slow, capped or intermittent connection you may want to consider skipping this step.
2. Remove Old Kernels (If No Longer Required)

Now, admittedly, this step is one you want to approach with caution.
Having a choice of kernels to boot up is, honestly, quite handy, especially if you notice something has gone awry while using the latest one.
Unless you’re in the throes of constant hardware woes there’s little need to hoard kernels.
It’s easy to remove old kernels in Ubuntu. You can do it from the command line using the following command:
sudo apt-get autoremove --purge
Note that this command will only remove kernels that a) are no longer needed and b) were installed from the Ubuntu archive through system updates. If you install kernels manually or through a third-party PPA you’ll need to get your hands dirty.
3. Uninstall Apps & Games You Never Use (And Be Honest!)
Chances are you have a number of apps installed that you never use. Maybe you installed them on the back of an awesome review, out of nosiness, or to handle a particular task.
Whatever the excuse, if an app is no longer needed, but more space is, don’t be afraid to uninstall it.
Typical apps you may wish to expunge include web browsers (are you ever going to use Opera, Epiphany, Midori and Min?), music players (heck knows there’s enough of ’em) and games that sounded good in the Steam Store description but ended up being as much fun as a Windows 10 update combo.
And everyone has LibreOffce Draw knocking about doing nothing!
Don’t lie to yourself about might-needs, and could-dos. The beauty of most software is that it’s not going anywhere anytime soon. This is never truer than on Linux, where most apps are just an aptinstall command away.
To remove a specific app by name run:
sudo apt-get remove package-name1 package-name2
To remove packages and dependencies that are no longer required (because you’ve uninstalled other packages or newer versions have replaced them) run the following command:
sudo apt-get autoremove
4. Use A System Cleaner like BleachBit

Writing a list on system cleaning could easily end up 10x as long as this one if we were to tell you about every app, cache, log and system process hiding in every nook and cranny.
BleachBit saves us from doing that. It’s like the CCleaner of Linux – a byte scouring beast. The app can remove pretty much everything and anything and should only ever be used with caution.
It can wipe the caches of more than 70 popular desktop applications (including most web browsers); hoovers up old file, browser and bash history; and makes light work of logs you’ll never read.
No surprise that we recommend installing it as one of our things to do after installing Ubuntu.
You can install BleachBit on Ubuntu 16.04 LTS straight from Ubuntu Software. Run it as root, and check the boxes besides the parts you’d like to clean. Click ‘Preview’ to get an estimate of how much space they take up, and click “Clean” to remove them.
Install BleachBit from Ubuntu Software
5. Stay up to date (seriously, do it!)
The most obvious step on this list is also the one few people would think to recommend. Unlike Windows, where every new update adds more overhead, package updates on Linux regularlyfreespace rather than use it.
So next time you put off that 56MB librandom-package102 update fearing you’ll lose space, maybe think again!
Summary
That just about covers it. If you only remember two steps from this list make it the first and last.
- Clean your apt cache from time-to-time
- Install patches, updates, and fixes
Now go and free some space!
Let us know how much you manage to claw back (as well as share your own top space-saving tips) in the comments! To see more articles like this from Scott, share the love by sharing this article on social media.
5-ways-free-up-space-on-ubuntu, Free Up Space In Ubuntu, Free Up Space On Ubuntu, How To Free Up Space On Ubuntu

Install & Manage Flatpak Applications
You might have realized almost all Linux distros provide the same software but differing versions. One such example is, a distro comes bundled with the latest version of LibreOffice (let’s say v6.0.3) and another distro comes bundled with LibreOffice but not the latest (let’s say v5.2.7). Flatpak is here to eradicate that issue.
But alas there’s this situation when the computer doesn’t belong to you; you’re on a standard user account, and you encounter a situation in which the computer asks administrative password to install the program. Great news! Flatpak applications can be installed for a standard user account also called per-user mode and not system-wide. Read on below how you can achieve that.
Browsing Flathub
Install Flatpak from Flathub


How To Uninstall Flatpak
So the actual syntax for uninstalling any flatpak app is:
flatpak uninstall <app name> –user
The disadvantage with installing and uninstalling any flatpak app is their very long weird application names. And in case you forget what the name for the application was you installed a long time ago, you could execute the command below to see the list of currently installed flatpak applications on your standard user account:
Conclusion
Flatpak Apps, Flatpak Chrome, Flatpak Example, Flatpak Install, Flatpak Linux, Flatpak On Ubuntu, Flatpak Repo, Flatpak Store, Flatpak Ubuntu

Make Any Website into Desktop App
Written by
Nativefier is a CLI tool that easily create a executable desktop application of any website with succinct and minimal configuration. Anybody can use it and it is a lot lighter than typical Electron apps.
Nativefier is based on the electron-package and since Electron apps are platform independent, any Nativefiered app will run on GNU/Linux distros as well as on Windows and Mac Operating Systems.

Talking about the reason why he created Nativefier, the developer wrote on GitHub:
I did this because I was tired of having to ⌘-tab or alt-tab to my browser and then search through the numerous open tabs when I was using Facebook Messenger or Whatsapp Web.
Features in Nativefier
- Free and open-source with code available on GitHub.
- Works on GNU/Linux, Windows, and Mac.
- Desktop Notifications.
- OS-specific icons.
- Make single-page web apps (e.g. Telegram and WhatsApp) executable stand-alone apps.
How to Install and Use Nativefier in Linux
Installing Nativefier is as easy as running the following command in terminal.
$ npm install nativefier -g
The developer has done some heavy lifting by setting up a template app containing appropriate event listeners and callbacks in the /app folder.
This is the directory that is copied to the temporary directory when the nativefier command is called and then the core methods of electron packager follow. meaning that getting a URL and invoking the nativefier gets the job done.
So, for example, creating a GitHub or WhatsApp web executable (or any web page) is as easy as typing:
$ nativefier -name GitHub http://github.com
$ nativefier web.whatsapp.com
The -name flag is the option that tells Nativefier the name to give your executable. There are other options including:
- flash to enable flash in your application explorer.
- version is prints the version of your nativefier install.
- platform automatically determined based on the current OS. Overwrite it by specifyinglinux, windows (or win32), or osx (darwin).
The full list of options and more usage details are on its GitHub page.
Note:
- Nativefier doesn’t have any back button by default because it is designed to wrap just single-page apps. That notwithstanding, you can build an executable from any url and hitting
backspaceon your keyboard will take you to the previous page. - Don’t put spaces when defining the app name with the
-nameoption on Linux because it will cause problems when pinning the app to the launcher.
Linux Mint, Linux Os, Linux Ubuntu
Install Nativefier, Nativefier Install, Nativefier Linux, Nativefier Release, Nativefier Ubuntu Ppa